This site was translated
by Globalink Weg translator
UNDERFLOOR HEATING UNDERTILE HEATING UNDER FLOOR TILE
Underfloor Heating Conservatory wintergarden
Heating technology Floor heating Heating engineering Building technology
Installation
Floor heating Electric floor heating Electrical floor heating Electric
thin-bed heating mats Tile heating Bathroom heating Thin-bed heating
Electric heating Parquet heating Laminate heating Foot heating mat Raychem
UnderFloor heating Anti-chill
heating
Not all electric floor
heating systems are the same
Electric floor heating
is safe, cheap and reliable
Heated floor
The low-cost heating systems for
taking the chill of the floor in the bathroom, kitchen, nursery or conservatory
(frost protection), with the brand-name thermostat from Eberle.
Electric floor heating for stone
floors, tiles, parquet or e.g. even beneath dry floors for renovation
of old buildings!
Thermofloor 2000 S &Thermofloor
S & Underfloor PV!!
| The Fliesenheizung:
or better
The Fliesentemperiersystem!
|
2 Standartbreiten 0,3m & 0,5m
with Schutzleiter
high quality
completely available with regulators & Fühlerschutzrohr
with Verlegeanleitung & current -
anschlussplan (very simply)! |
The Fussbodentemperiersystem, which offers you a very pleasant Wohnklima:
| Scopes: |
Use & advantages: |
Baths and kitchens
Verkaufsräume e.g. butchers
Offices
at slight Fussbodenaufbauhöhen
aesthetic reasons (no radiator)
Altbausanierung
Teilflächenheizung Sitzgruppen
Wintergartentemperierung (frost) |
Simple and fast transfer
fast temper (in the morning in the bath)
with timeswitchclock adjustable
extremely thin Heizmatten, 2mm thickly
surely, advantageously, maintenance-free
corresponds to international norms
warm feet cool head
pleasant Wohnklima
through high thermal radiation Temperaturabsenkung
possibly |
Verkaufspreisliste ' 99 in DM
All prices are inclusively the legal
value-added tax of 16%.
Thermofloor 2000 S:
| Thermofloor 2000 S 160 watt /m2; width 30 cm |
| Kind - No: |
Performance:
Watt/Stück |
Measured:
L x B in m |
Flat:
m2; |
Price
DM |
| TF2S16 |
160Watt |
3,3x0,3 |
1m2; |
174,00 |
| TF2S26 |
320Watt |
6,7x0,3 |
2m2; |
313,20 |
| TF2S36 |
480Watt |
10x0,3 |
3m2; |
440,80 |
| TF2S46 |
640Watt |
13,3x0,3 |
4m2; |
556,80 |
|
|
|
|
|
| Thermofloor 2000 S 130 watt /m2; width 50 cm |
| TF2S53 |
650Watt |
10x0,5 |
5m2; |
522,00 |
| TF2S63 |
780Watt |
12x0,5 |
6m2; |
614,80 |
| TF2S73 |
910Watt |
14x0,5 |
7m2; |
719,20 |
| TF2S83 |
1040Watt |
16x0,5 |
8m2; |
812,00 |
| TF2S93 |
1170Watt |
18x0,5 |
9m2; |
904,80 |
| Thermofloor 2000 S 100 watt /m2; width 50 cm |
| TF2S10 |
100Watt |
2x0,5 |
1m2; |
156,60 |
| TF2S20 |
200Watt |
4x0,5 |
2m2; |
220,40 |
| TF2S30 |
300Watt |
6x0,5 |
3m2; |
336,40 |
| TF2S40 |
400Watt |
8x0,5 |
4m2; |
417,60 |
| TF2S50 |
500Watt |
10x0,5 |
5m2; |
510,40 |
| TF2S60 |
600Watt |
12x0,5 |
6m2; |
591,60 |
Thermofloor S:
| Thermofloor S 160 watt /m2; width 50 cm |
| TFS1 |
160Watt |
2x0,5 |
1m2; |
116,00 |
| TFS2 |
320Watt |
4x0,5 |
2m2; |
185,60 |
| TFS3 |
480Watt |
6x0,5 |
3m2; |
255,20 |
| TFS4 |
640Watt |
8x0,5 |
4m2; |
324,80 |
| TFS5 |
800Watt |
10x0,5 |
5m2; |
394,40 |
| TFS6 |
960Watt |
12x0,5 |
6m2; |
464,00 |
Underfloor PV:
| Underfloor PV/4 160 watt /m2; width 30 cm |
| Kind - No: |
Performance:
Watt/Stück |
Measured:
L x B in m |
Flat:
m2; |
Price
DM |
| UPV 160 |
160Watt |
3,3x0,3 |
1m2; |
150,80 |
| UPV 320 |
320Watt |
6,7x0,3 |
2m2; |
220,40 |
| UPV 480 |
480Watt |
10x0,3 |
3m2; |
307,40 |
| UPV 640 |
640Watt |
13,3x0,3 |
4m2; |
400,20 |
|
|
|
|
|
| Underfloor PV/5 130 watt /m2; width 50 cm |
| UPV 530 |
650Watt |
10x0,5 |
5m2; |
406,00 |
| UPV 630 |
780Watt |
12x0,5 |
6m2; |
475,60 |
| UPV 730 |
910Watt |
14x0,5 |
7m2; |
556,80 |
| UPV 830 |
1040Watt |
16x0,5 |
8m2; |
632,20 |
| UPV 930 |
1170Watt |
18x0,5 |
9m2; |
696,00 |
| Underfloor PV/5 100 watt /m2; width 50 cm |
| UPV 100 |
100Watt |
2x0,5 |
1m2; |
116,00 |
| UPV 200 |
200Watt |
4x0,5 |
2m2; |
197,20 |
| UPV 300 |
300Watt |
6x0,5 |
3m2; |
255,20 |
| UPV 400 |
400Watt |
8x0,5 |
4m2; |
336,40 |
| UPV 500 |
500Watt |
10x0,5 |
5m2; |
406,00 |
| UPV 600 |
600Watt |
12x0,5 |
6m2; |
487,20 |
| Regulators & Installationsset |
|
|
|
Price: |
from 5 StückEinkauf-preis/ST. |
Eberle
EB52527 |
El. -Temperaturregler
with Bodenfühler
Tageszeitschaltuhr |
232, - |
220,40 |
Eberle
EB 52528 |
El - Thermostat
with Bodenfühler
Wochenzeitschaltuhr |
232, - |
220,40 |
Eberle
EB
52521 |
El - Thermostat
with Bodenfühler |
150,80 |
139,20 |
| INSTSET |
UP.Anschlussdose 100x100Fühlerschutzrohr
1m & Flexrohr |
46,40 |
30, - |
| Sale
and terms of delivery: |
The sale prices understand themselves inclusively the legal value-added
tax in an amount of presently 16%.
|
|
Lagerware 2 to 5 days, rare articles and larger numbers of pieces
up to 1 - 2 weeks.
In writing or per fax. To the Bestellblatt copy
DM incl. 16% MwST.
Per post plus postage and packaging. Attention: The delivery results
per C.O.D..
|
| Händleranfragen are desired!! |
Thermofloor S & Thermofloor 2000 S and Underfloor
PV
On a Textilgewebe is mäanderförmig the Heizleiter incensed. The
Heizleiter has only approx. 2mm diameters is feuchtigkeitsbeständig and
schutzisoliert, he/it is composed of a high-grade Widerstandslegierung.
At the beginning and at the end one each Heizmatte are 4m long Anschlussleitungen
(Neutralleiter/Schutzleiter, phase, Schutzleiter) from verzinntem coppers
appropriate. The Connecting - muffen are absolutely waterproof and zugentlastet
besides hochtemperaturbeständig. The Heizmatten leave themselves through
the hochflexible Textilgewebe without Aufwölbung smooth on the floor verlegen.Durch
the two Lieferformen the Heizmatte of 0,3m and 0,5m in different lengths
are different Quadratmetergrössen available. For the Beheizung of carpet,
PVC, parquet are anticipated the Leistungsklassen by 100 Watt/m2;, at tiles
and Steinbelägen should be used 160 Watt/m2; or 130 Watt/m2;. Thermofloor
S with 160 Watt/m2; finds at Wintergärten applications.
|
|
To
Thermofloor
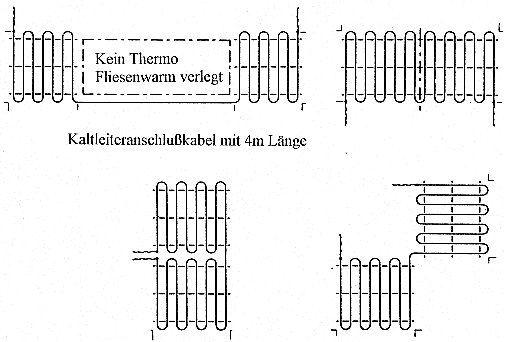
Verlegebeispiele:
| On each smooth underground, like cement floor or as well as often
chipboard uses at Althaussanierung, on feuchtig - keitsbeständiger, can consider
the Heizmatte transfers werden.Bitte - " references for the setting and
transferring of ceramic tiles and disks on Holzspanplatten " - the trade
association of the German Fliesengewerbes. Also at Hotly - or Gussasphalt
must be considered, that these one temperature - beständigkeit of 80 C displays.
The Heizelemente are when transferring very flexiebel. Through the mäader
- förmig embarrassed Heizleiter can be reached a diversity and high variation
of the transfer. At the most different outlines is so an optimal adjustment
possibly (at two Verlegebreiten of 0,3m and 0,5m). |
|
|
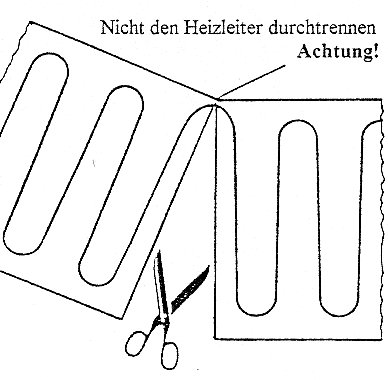
Through a cutting with an ordinary Haushaltsschere in the Textilgewebe,
the Heizelemente can be adjusted easily to the desired outline loudly Verlegeplan.
Now the antenna - schutzrohr must be transferred still in the floor, so
that the antenna can be introduced by the Heizungsanschlussdose in the Fühlerschutzrohr
and lie comes under the area of the heated plain to that. In the connection
covering - or Flexkleber (80C, by Knauf or PCI) can be begun with a temperaturbeständigen,
which compress tailored Heizmatte on the dry, smooth and dust-free floor
to verlegen.Heizmatte with Heizleiter after above in the Kleber, without that
the Heizleiter touch or lie one on the other. If the Heizmatte is completely
important, that is pasted in vollflächig (without Lufteinschlüsse). Oberbelag
with Flexkleber transfer, and/or Smoothed as mech. Protection at the transfer
of cork, PVC. etc. |
To
Thermofloor
The electric connection in the UP-Heizungsanschlussdose:
Only by an admitted expert the electric connection may be executed the
Thermofloor Heizbodens after the counting Vde - instructions and the Montageanweisung.
Also the Durchgangswiderstand (or the conductivity) must be measured during
the entire Montageablauf the Heizmatte. Through the constant measurement
the Durchgangswiderstand is guaranteed, that a damage is recognized the
Heizmatte immediately and can be exchanged the damaged Heizmatte against
a new and sound Heizmatte. At each mat the Ohmwert is to be entered in the
Revisionsplan and in the Leistungsschild (Verteilerkasten). Also a FI-Schutzschalter
with 30 mA should find in the Heizstromkreis application (in so far as not
already the whole apartment is equipped or at least the bathroom with a
Fi - protection), to guarantee especially in showers and baths the protection
and the safety against dangerous Körperströme. The Anschlussleitungen introduced
in the Unterputzdose the Heizmatte and the Temperaturfühlers are to be connected
after the below-mentioned circuit diagram. To a flawless connection the
Schutzleiters (gelb/grün) pay attention.
To
Thermofloor
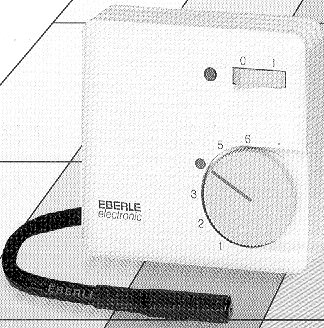
The Temperaturregelung: EB
52521
| The Bodentemperatur is recorded with the Ntc - antenna and regulated
with the electronic thermostat EB 52521. The antenna of the regulator is
directly under the Heizebene, in the cement floor between the Heizleitern
in the Fühlerschutzrohr transfers. At the regulator the Bodentemperatur
can be discontinued the personal snugness - wunsch
or accordingly after Anwendungsfall (Wohnbereich or bathroom) . |
|
EB 52527
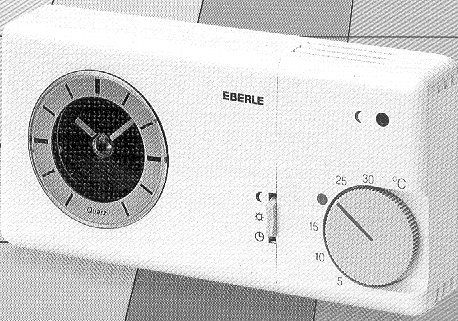
|
Without renunciation on snugness and comfort however especially
energy-saving because timewise controllable guarantees the regulation with
the special Uhrenthermostat EB 52527. The outlook should be undertaken so,
that 30 minutes before the Benutzungszeit results the automatic insertion
through the Elektronikregler. During or after the use is switched off again
automatically and not heat unnecessarily. Naturally can be switched off also
simply outside the discontinued times at the switch a - and. |
To
Thermofloor
The Leitungsverlegung and Leitungsverdrahtung:
A comprehensive installation and instruction is attached each delivery.
Installation - and instruction:
To
the beginning:
1.Informationen for the user:
The order please carefully preserve and submit at Besitzwechsel the Nachbesitzer
or the new user. Thermofloor and Underfloor PV corresponds to the VDI. After
these determinations must be this order always available and will submit
at works at the heating the assembler to the perusal.
Only an admitted expert may execute the installation the Heizmatte.
After resulted installation and starting is to be submitted by the plumber
a Revisionsplan, which is to be preserved carefully with the installation
- and instruction. The Revisionsplan lists, at which places of the room
the Heizmatte transfers and the Fühlerschutzrohr was installed and at which
place the Leistungsschild appropriate ist.Im embarrassed area the Heizmatte
may be brought in no gedübelten screws for any Befestigungszwecke. In the
area of the walls a unbeheizte zone by approx. 50 cm is to be anticipated
width already in the planning, in so far as late closets with vollflächiger
should be found supporting surface there. Further covers e.g. through carpets
with more than 12mm thickness increase the temperatures in the floor and
must be avoided. The dates of performance the Heizbodens are noted by the
assembler at the Innentür of the electric distribution well visibly. To
the content
2. Betriebsfunktion:
A direct underfloor heating is The Heizbodens, which makes possible a quick
warming individual cold Gehbereiche e.g. in kitchens, baths, Saunabereichen
halls or Sitzgruppen. The Heizboden does not serve first of all the Raumheizung
(the required Heizleistung of the room is covered in the normal case by
an other Heizquelle), but only the tempering the cold Fussbodenbereiches.
The temperature is lifted according to outlook only around some Temperaturgrade,
so that the Heizboden consumes only the least time electric current and
is to be pursued thus very sparingly. In the necessity the entire performance
can be claimed also the Heizbodens, in that the regulator becomes according
to hochgestellt. The Heizboden is pasted directly on the cement floor and
sticks only in a 5mm to 10mm thick Klebeschicht and can submit therefore
quickly his warmth at the floor-covering and for a pleasant temperature
in the Fussbereich sorgen.Über an electronic Bodentemperaturregler results
the regulation the Heizbodens. In the Heizebene the antenna is installed
and compares the temperature discontinued at the regulator with the Bodentemperatur.
The Heizboden is switched off according to Wärmeanforderung and the Bodentemperatur
discontinued at the Drehknopf through the regulator a - and. Sonneneinstrahlung,
Wärmegewinn through persons, lighting or other Wärmequellen are recorded
through the regulator and considers. Also the regulator as Frostwächter.Der
serves regulators supervises itself personally, which means at Spannungsausfall,
Fühlerkurzschluss or Fühlerbruch switches off itself the regulation the Heizbodens
selbsständig. To
the content
3. service:
The service the Heizbodens limits itself to the outlook the desired Bodentemperatur
at the Drehknopf of the regulator. The temperature can be discontinued using
the Celsiusgradzahlen easily. The achievable Bodentemperaturen are from the
floor-covering (tiles or cork) and the insulation the cement floor dependent.
Read please also the operating instruction the Reglers.Einen especially energy-saving
organization can reach you through the application a Zeitschaltuhrreglers
(e.g. EB 52527). With this regulator the Heizboden can be switched off after
personal habits to certain times a - and. The Heizbeginn is to be chosen
approx. 30 min (according to Leistungsklasse of the Heizbodens) before the
Benutzungszeit and can be stopped also approx. 30 min before end the Benutzungsdauer.
To
the content
4. Maintenance and disturbance:
A maintenance of the heating is not necessary. In the disturbance you
examine, whether the regulator is discontinued for the heating. At day -
or weeks program, whether the Betriebszeit is discontinued correctly. Put
firmly whether the security or the FI-Schutzschalter have triggered. If no
warming is to ascertain inform you your assembler and submit Him/it the Revisionsplan.
To
the content
5. For the assembler:
The Montageanweisungen are to be considered at the installation.
These orders must be after counting Vde - determinations any time available
and will submit at works at the heating the plumber for the regard. For
that reason we ask you, which Revisionsplan along with this order to surrender
the consumer for the careful storage.
- Heizleiter after DIN owns The Flächenheizelement Thermofloor or
Underfloor PV VDE 0700 and can under observance relevant Installationsvorschriften
in the Innenbereich of living spaces, showers and bathrooms, indoor swimming
pools and damp and/or, wet rooms for the Temperierung of the floor are
installed.
- Only an expert may execute the installation and the connection the
Heizbodens as well as other electric Betriebsmittel. To it is the DIN VDE
0100, to consider part 520 A3.
- Special Installationsnormen count besides at:
- Duschräumen and bathrooms: DIN VDE 0100, part 701.
- Considered swimming pools: DIN VDE 0100, part 702.
- Damp and wet areas: DIN VDE 0100, part 737.
1. The Heizboden is determined using the plain and performance (Watt/m2;)
to be heated.
Verlegeplan in the Grundrissplan einzeichnen (Verlegebahnbreite consider
0,5m or 0,3m).
2. The Heizboden can on each smooth underground like feuchtigkeitsgeschützte
Holzspanplatten or simple cement floor are transferred.
3. attention: If the Heizbodens should be transferred on Heissasphalt,
must it
Heissasphalt approx. 80 C temperaturbeständig be.
4. In Sanitärräumen the plains must them for the installation of status
- Wc, bathtub,
Shower, ect. necessary have be left out. To leading materials must at
least 30mm
Stood off are held.
5. The Heizmatten under closets do not transfer.
6.Heizungsanschlussdose
outside of bath or WC set
(Wandfliesen complicate the accessibility).
7. Necessary plumbing and Leerrohre transfer (see
Anschlussplan).
8. Fühlerschutzrohr under heated acreage install and Flexrohr in Heizungsanschlussdose
introduce.
9. Heizelemente on them to beheitzende acreage explain and adjust.
Durchgangswiderstand, conductivity examine. Important: Under no circumstances
the Heizleiter the Heizmatte shorten.
The Heizmatte always as whole piece transfer.
Never the rolled up Heizmatte heat! Zerstörungsgefahr!!
10. Underground clean and pre-treat. There are allowed to do no sharp
or sharpen elevations
or deepens in the underground be available. The Heizmatte not with nails
or metallic object fasten.
11. At the transfer the Heizmatte these do not squeeze or crack. Not with
Zugbeanspruchung transfer.
12th Paid attention: Under no circumstances the Heizleiter the Heizmatte
cross.
13th Specially - Fliesenkleber (Flexkleber) use and with Zahnspachtel
5mm evenly
direct.
14. Never: The Heizmatte may not cross with Dehnungsfugen in the floor.
15. In the area the Heizmatte no gedübelten screws bring in.
16. The Heizmatte with the smooth Fliesseite after below in the Kleber
bring in and
easily press.
17. Kaltleiterenden and Schutzleiter in the Fliesenkleberbett to the Heizungsanschlussdose
lead and
once more Durchgangswiderstand conductivity examine.
18th Heizungsanschlussdose loudly plan wire.
19. Always as mech. Protection, which Heizmatte with a second layer
Spezialfliesenkleber (Flexkleber) 5mm carefully cover, (important hint,
Flexkleber a
- " little dünnflüssiger"anrühren, it must be ensured, that itself no
air bubbles or
Lufteinschlüsse in the Flexkleber and in the area the Heizmatte under
the tiles can form)
If Natursteinbelag tile or bring in in this Kleberbett, once more
Durchgangswiderstand conductivity examine. Would be the Heizmatte at the
transfer
if one damaged been could remove the Heizmatte now still and against one
undamaged Heizmatte exchange.
20. At the transfer of Parkett,Teppichboden, cork, PVC, ect. Kleberbett
with Glättscheibe
smooth.
21. After two days the erstemal carefully heat. (5 C/Tag)
22. At the transfer of parquet, carpeting, cork, PVC, ect. Undercoat to
it
According to Haftvermittlung the Herstellerangaben use.
23. Heated floor not with carpets the thicker than 12mm are covered (Wärmestaugefahr).
Vollflächige pieces of furniture may not be put on heated plains.
24. Users over the Fliesenheizung einweisen and Revisionsplan with Verlegeplan
submit.
In the electric distribution a reference place, (floor electrically heats.)
just as rooms indicate.
To the content
| 6. Schematic
construction the Heizbodens: |
7.
Example for Transfer and Revisionsplan: |
|
|
|
To
the content
8. It Transfer - and Revisionsplan draw:
Before the Heizmatte transferred will must be noted in the Revisionsplan
(outline) following points.
At which places in the room itself
- the Heizboden
- the Fussbodentemperaturfühler and the course the Fühlerschutzrohr
- the Kaltleiter (phase, Neutralleiter, Schutzleiter) the Heizmatte
find.
- In showers and bathrooms the plains of bathtubs must, Duschwannen,
status - Wc ect. if werden.Von left out leading materials min 30 mm stand
off.
- To walls a distance from 30 cm can be held to 50 cm (depending on
these plains later with vollflächigen pieces of furniture are covered).
After the installation the Revisionsplan is to be submitted the user
in any case for the careful storage.
Outline with Transfer - and Revisonsplan:
To
the content
9. preliminary treatment of the acreage to be heated:
First of all the surface the floor check, whether sharp or pointed elevations
or deepens tower from the floor, which the Heizmatte could damage. If that
should be the case, must to transfer these carefully removes werden.Vor
of the installation the Heizmatten is a Unterputzdose at a favorable place
(in the bath because of the tiles günstigerweise on the outside e.g. in the
passage), in which both the Kaltleiter as well as the Fühlerschutzrohr can
be introduced well. In the Unterputzdose an electric connection with 3x1,5
is to be put mm2; Anschlussleitungen. From the Unterputzdose to the place
at that the electronic Bodentemperaturregler be found should put a Anschlusskabel
with 5x1,5 mm2;.
Attention:
The Kaltleiter are to be introduced without extension in the Unterputzdose,
which Bodentemperaturfühler is to be transferred in a separate Fühlerschutzrohr
Ø 13 mm (at that best immediately antennas and Fühlerschutzrohr together
with each other transfer). The transfer has to result so, that the antenna
is found in the Fühlerschutzrohr directly under the area the later embarrassed
Heizboden in the cement floor (like in the Revisionsplan anticipated).
Kaltleiter the Heizboden and the antenna of the regulator may not be
transferred in the same Leerrohr.
The Bodenfühler of the regulator in the Fühlerschutzrohr introduce and
pay attention to it, that the end of the antenna in the Fühlerschutzrohr
at the following transfer in the area between two Heizleiter are used befindet.Sollte
an open Fühlerschutzrohr, so is to be locked this with a plug, that no
Fliesenkleber can penetrate itself into the reed.
The Fühleranschlussleitungen so transfer, that these cross the Heizleiter
neither nor touch. To
the content
10. Yield the Heizbodens:
With the Heizleiter after above the Heizmatte on the Verlegefäche, according
to the outline and Revisionsplan, yield. With a scissors the Stoffgewebe
can (attention: only the Stoffgewebe not the Heizleiter durchtrennen) are
cut through and are brought so the Heizmatte in the desired Verlegeform. Attention
important: Never the Heizleiter may be shortened the Heizmatte. The Heizleiter
at the durchtrennen the Textilgewebes do not damage.
At the durchtrennten place the Textilgewebes can be bent the Heizleiter
now carefully and are transferred parallel to the first path. The Heizleiter
however do not crack, which totals kleinst possible Biegeradius 20mm.
Also important:
The Heizbahnen the Heizmatte never one on the other transfer. Between
the Heizleitern must be at least a distance from 3cm available.
After this pattern the entire Verlegefläche is explained now with the
Heizmatte.
Attention warranty:
With a gauge the Ohmwert must be determined the Heizmatte (comparisons
with technical data) and in the Revisionsplan as well as in the Stromverteilung
are noted.
The Kaltleiter become, while the Heizmatte is pasted, in which Kleberbett
transfers to the Heizungsanschlussdose and introduced in the Heizungsanschlussdose
(the best in a separate Flexrohr, which leads from the wall - Estrichkante
in the Heizungsanschlussdose).
To
the content
11. Kleber for Heizmatte and Oberbelag:
| At the Verklebung the Heizmatte, the transfer of tiles as well as
as mechanical protection at Oberbelägen like carpets, PVC, cork, ect. if
Flexkleber suit, which are to maximum 80 C temperaturbeständig. |
1. Kleber for Heizmatten and ceramic disks (tiles) or Natursteinplatten:
PCI-Flexmörtel Specially - Fliesenkleber for balcony, terrace and underfloor
heating
Kleberbettdicke to maximum 5mm, from -20C to 80C, drying time approx.
4-5 hours.
Pci - Flexmörtel - Quickly Specially - Fliesenkleber for balcony, terrace
and underfloor heating
Kleberbettdicke to maximum 5mm, from -20C to 80C, drying time approx.
2-3 hours
or products of Knauf (ask you your Knauffachhändler)
2. Trittschutz at Oberbelägen, carpet, PVC, cork ect.
Around at the transfer of carpets, PVC, cork ect. a mechanical protection
to guarantee, must be covered the Heizmatte with a protective layer by
5 to 10 mm.
We recommend:
PCI-Periplan 10 to 10mm Schichtstärke
PCI-Periplan 20 to 20mm Schichtstärke
While the entire transfer examine with a gauge, whether the Heizmatte
is still conductive (Ohmwerte loudly technical data) To
the content
12th pasting the Heizmatten:
At the transfer of tiles and natural stones:
The instructions the Kleberherstellers are at the processing exact to
consider.
The Kleber is directed with a Zahnkelle (3-4 mm) on the floor. In this
Kleberbett the Heizmatte is inserted with the Heizleiter after above (smooth
page after below) and pressed with a Glättscheibe carefully. The durchgedrückten
Kleber carefully glattziehen. After that the upper side is covered the Heizmatte
once more with a layer of (Zahnspachtel 4-6 mm) Specially - Flexkleber, in
which directly the tiles or the natural stone is put. At the transfer on
it pay attention, that the Temperaturfühler comes between two Heizleitern
(loudly Revisionsplan) for the lying. The Kaltleiter just on the floor in
the Kleberbett to the Heizungsanschlussdose transfer and introduce through
a prepared Flexrohr in the Heizungsanschlussdose.
At the Verfugen of the tiles Flexfugenmasse use.
At the transfer of Oberbelägen like carpeting, PVC, cork, parquet:
After the Heizmatte was brought in described how above, and with a second
layer Specially - Flexkleber was covered, this mechanical protective layer
with the Glättscheibe must become cautious glattgezogen. werden. If necessary
can be covered after 24 hours these dry Kleberfläche once more, with it the
surface smooth and even becomes (PCI-Periplan). The Verarbeitungshinweise
of the respective fillers - maker are exact to consider.
The preliminary treatment of the surface hangs from the further application
the special Kleber
z. B. from cork, PVC, parquet or carpeting from. An undercoat for the
consolidation, Haftverbesserung should be anticipated in any case as underground
- preliminary treatment.
At the earliest after three days the Oberbeläge can be begun according
to damps in the underground with the transfer.
Only for underfloor heating suitable Oberbeläge use.
To consider are following values for the warmth - Leitwerte:
- -Wert = 0,14 W/(m.K) at parquet maximum 16mm thickly
- -Wert = 0,09 W/(m.K) at carpeting maximum 20mm thickly
- -Wert = 0,08 W/(m.K) at cork maximum 10mm thickly
- -Wert = 0,23 W/(m.K) at PVC maximum 10mm thickly
- -Wert = 1,00 W/(m.K) at tiles maximum 30mm thickly
- -Wert = 1,00 W/(m.K) at natural stone maximum 30mm thickly
Attention:
The Heizleiter may not touch the Kaltleiter and do not cross also.
While the entire transfer examine the Ohmwerte and compare with the
first measurement...
At a damage the Heizmatte is recognized this immediately and the damaged
Heizmatte can be exchanged against a sound Heizmatte.
The room mark, that the Handwerkerkollegen are informed about the electric
underfloor heating. To
the content
13th electrics connection:
Only by an admitted expert the electric connection may be executed the
Heizmatte after the counting Vde - instructions and the Montageanweisung.
The Heizboden must be connected electrically so, that allpolig totals
the Kontaktöffnungsweite at least 3mm of the net. Ls - Switch, securities
and marksman in the distributor are suitable Trennvorrichtungen. The instructions
the local EVU are to be considered. Also a FI-Schutzschalter with 30 mA
should find in the Heizstromkreis application, to guarantee especially in
showers and baths the protection and the safety against dangerous Körperströme
(normally extend it from if the apartment is furnished or at least the Badezimmerverteilung,
from which the Heizstrom originates, with a Fi - protection). The Heizbodens
according to the circuit diagrams connect. To a flawless connection the Schutzleiters
(gelb/grün) pay attention. There can be connected several Heizböden to an
electronic thermostat. It in the technical data indicated maximum Schaltstrom
and/or Schaltleistung is to be considered.
To
the content
14. Circuit diagrams:
z. B: Leitungsverlegung:
After the work: After the works finished is must be placed in the Verteilerschrank
a Leistungsschild with entered Ohmwert at well visible place. In the Revisionsplan
these Verteilerplatz note and the user this installation and instruction
for the careful storage übergebenInbetriebnahme: After 48 hours the Heizmatte
can be heated the first times carefully (5 C/Tag)
Leitungsverdrahtung: EB 52521 Leitungsverdrahtung: EB 52527 / 28
To
the content
Technical data: Messprotokoll:
| Kind - No: |
Performance:
Watt/Stück |
Measured:
L x B in m |
Flat:
m2; |
Ohmwert /
Heizmatte
approx. |
Tension:
1/N/PE |
DreiMesswerte:
per rooms:
Ohm |
| Thermofloor 2000 S or Underfloor PV/5 160 watt /m2; |
| TF2S16/UPV160 |
160 watt |
3,3x0,3 |
1 |
330 Ohm |
230V/50Hz |
|
| TF2S26/UPV260 |
320 watt |
6,7x0,3 |
2 |
165 Ohm |
230V/50Hz |
|
| TF2S36/UPV360 |
480 watt |
10,0x0,3 |
3 |
110 Ohm |
230V/50Hz |
|
| TF2S46/UPV460 |
640 watt |
13,3x0,3 |
4 |
82 Ohm |
230V/50Hz |
|
| TF2S56/UPV480 |
800 watt |
16,7x0,3 |
5 |
66 Ohm |
230V/50Hz |
|
| Thermofloor 2000 S or Underfloor PV/5 130 watt /m2; |
| TF2S53/UPV530 |
650 watt |
10x0,5 |
5 |
81 Ohm |
230V/50Hz |
|
| TF2S63/UPV630 |
780 watt |
12x0,5 |
6 |
68 Ohm |
230V/50Hz |
|
| TF2S73/UPV730 |
910 watt |
14x0,5 |
7 |
58 Ohm |
230V/50Hz |
|
| TF2S83/UPV830 |
1040Watt |
16x0,5 |
8 |
51 Ohm |
230V/50Hz |
|
| TF2S93/UPV930 |
1170Watt |
18x0,5 |
9 |
45 Ohm |
230V/50Hz |
|
| Thermofloor 2000 S or Underfloor PV/5 100 watt /m2; |
| TF2S10/UPV100 |
100 watt |
2x0,5 |
1 |
530 Ohm |
230V/50Hz |
|
| TF2S20/UPV200 |
200 watt |
4x0,5 |
2 |
264 Ohm |
230V/50Hz |
|
| TF2S30/UPV300 |
300 watt |
6x0,5 |
3 |
176 Ohm |
230V/50Hz |
|
| TF2S40/UPV400 |
400 watt |
8x0,5 |
4 |
132 Ohm |
230V/50Hz |
|
| TF2S50/UPV500 |
500 watt |
10x0,5 |
5 |
106 Ohm |
230V/50Hz |
|
| TF2S60/UPV600 |
600 watt |
12x0,5 |
6 |
88 Ohm |
230V/50Hz |
|
| Thermofloor S 160 watt /m2; |
| TFS116 |
160 watt |
2x0,5 |
1 |
330 Ohm |
230V/50Hz |
|
| TFS216 |
320 watt |
4x0,5 |
2 |
165 Ohm |
230V/50Hz |
|
| TFS316 |
480 watt |
6x0,5 |
3 |
110 Ohm |
230V/50Hz |
|
| TFS416 |
640 watt |
8x0,5 |
4 |
82 Ohm |
230V/50Hz |
|
| TFS516 |
800Watt |
10x0,5 |
5 |
66 Ohm |
230V/50Hz |
|
| TFS616 |
960Watt |
12x0,5 |
6 |
55 Ohm |
230V/50Hz |
|
Technical data:Eberle 52527 / 28
 Back
Back
Bestellblatt:
To the order you click Produktnamen in the dunkelblauen
Anzeigefeld and choose on the right the Produktkategorie from choose you
the products through it - " orders " - Button. The products will print then
automatically in the Auswahlmenü - " Faxbestellung " - on the left below
transfer that you from and then fax or can send with the post.
| Kind - No: |
Performance:
Watt/Stück |
Measured:
Long x B
in m |
Flat:
m2; |
ordered piece: |
Preis:DM |
Gesamt:DM |
Thermofloor 2000 S or Underfloor PV 160 watt /m2; width 30 cm
| TF2S16/UPV160 |
160 watt |
3,3x0,3 |
1m2; |
|
|
|
| TF2S26/UPV260 |
320 watt |
6,7x0,3 |
2m2; |
|
|
|
| TF2S36/UPV360 |
480 watt |
10,0x0,3 |
3m2; |
|
|
|
| TF2S46/UPV460 |
640 watt |
13,3x0,3 |
4m2; |
|
|
|
|
800 watt |
16,7x0,3 |
5 m2; |
|
|
|
Thermofloor 2000 S or Underfloor PV 130 watt /m2; width 50 cm
| TF2S53/UPV530 |
650 watt |
10x0,5 |
5m2; |
|
|
|
| TF2S63/UPV630 |
780 watt |
12x0,5 |
6m2; |
|
|
|
| TF2S73/UPV730 |
910 watt |
14x0,5 |
7m2; |
|
|
|
| TF2S83/UPV830 |
1040Watt |
16x0,5 |
8m2; |
|
|
|
| TF2S93/UPV930 |
1170Watt |
18x0,5 |
9m2; |
|
|
|
Thermofloor 2000 S or Underfloor PV 100 watt /m2; width 50 cm
| TF2S10/UPV100 |
100 watt |
2x0,5 |
1m2; |
|
|
|
| TF2S20/UPV200 |
200 watt |
4x0,5 |
2m2; |
|
|
|
| TF2S30/UPV300 |
300 watt |
6x0,5 |
3m2; |
|
|
|
| TF2S40/UPV400 |
400 watt |
8x0,5 |
4m2; |
|
|
|
| TF2S50/UPV500 |
500 watt |
10x0,5 |
5m2; |
|
|
|
| TF2S60/UPV600 |
600 watt |
12x0,5 |
6m2; |
|
|
|
Thermofloor S 160 watt /m2; width 50 cm
| TFS1 |
160 watt |
2x0,5 |
1m2; |
|
|
|
| TFS2 |
320 watt |
4x0,5 |
2m2; |
|
|
|
| TFS3 |
480 watt |
6x0,5 |
3m2; |
|
|
|
| TFS4 |
640 watt |
8x0,5 |
4m2; |
|
|
|
| TFS5 |
800Watt |
10x0,5 |
5m2; |
|
|
|
| TFS6 |
960Watt |
12x0,5 |
6m2; |
|
|
|
Regulators & Installationsset for Thermofloor S & 2000S as well
as Underfloor PV
| EB 52527 |
El. -Temperaturregler with Bodenfühler
Tageszeitschaltuhr |
|
|
|
| EB 52528 |
El - Thermostat with Bodenfühler
Wochenzeitschaltuhr |
|
|
|
| EB 52521 |
El - Thermostat with Bodenfühler |
|
|
|
| Instset |
UP.Anschlussdose 100x100
Fühlerschutzrohr 1m & 2x Flexrohr |
|
|
|
Address or stamps with signature:
Endpreis: |
Fliesenheizung Elektroheizung electric
Wärmeboden floor heating system Heizboden Heizmatten heat warm bath kitchen
Kinderzimmer tiles stone floor cold feet Trockenboden Altbausanierung Ferkelaufzucht
Fliesenkleber Eberle Tekmar Termostat
electric underfloor heating Fliesenheizung
floor heating system Heizmatten Wärmeboden Badheizung Temperierung Speicherheizung
bath tiles Elektroheizung Flächenheizung Wintergarten frostschutz Eberle
Heizboden Dünnbrettheizmatten Altbausanierung Trockenboden warmth cold feet
Fuesse parquet Fliesenkleber Bodentemperierelemente 48V renovating Zeitschaltuhr
Fliesenheizung Elektroheizung electric
Wärmeboden floor heating system Heizboden Heizmatten heat warm bath kitchen
Kinderzimmer tiles stone floor cold feet Trockenboden
Altbausanierung Ferkelaufzucht Fliesenkleber
Eberle Tekmar thermostat Wochenzeitschaltuhr
electric underfloor heating Fliesenheizung
floor heating system Heizmatten Wärmeboden Badheizung Temperierung Speicherheizung
bath tiles Elektroheizung Flächenheizung Wintergarten
frostschutz Eberle Heizboden Dünnbrettheizmatten
Altbausanierung Trockenboden warmth cold feet Fuesse parquet Fliesenkleber
Bodentemperierelemente 48V renovating Zeitschaltuhr warm floor Heizleitung
floor-covering Badfussboden bad fliesenheizung elektroheizung tile Tageszeitschaltuhr
Raumheizung Thermo Fliesenwarm electronically Fussbodenfühler floor of
warm warms feet Fuesse planning elekto Direktheizung Zusatzheizung
Tageszeitschaltuhr Raumheizung Thermo
Fliesenwarm electronically Fussbodenfühler
Fliesenheizung Elektroheizung electric
Wärmeboden floor heating system Heizboden Heizmatten heat warm bath kitchen
Kinderzimmer tiles stone floor cold feet Trockenboden
Altbausanierung Ferkelaufzucht Fliesenkleber
Eberle Tekmar thermostat Wochenzeitschaltuhr
electric underfloor heating Fliesenheizung
floor heating system Heizmatten Wärmeboden Badheizung Temperierung Speicherheizung
bath tiles Elektroheizung Flächenheizung Wintergarten
frostschutz Eberle Heizboden Dünnbrettheizmatten
Altbausanierung Trockenboden warmth cold feet Fuesse parquet Fliesenkleber
Bodentemperierelemente 48V renovating Zeitschaltuhr
Cabeltherm Unitherm Flexel ThermoVlies
plus BET bet 2000 ElektroTherm Bauerhin Halmburger comfortfloor Dynatherm
Heizfolie Heizteppich Comfortfloor Sucotherm
Technical
data:
To
the Bestellblatt
Installation - and instruction:
To
the beginning:
1.Informationen for the user:
The order please carefully preserve and submit at Besitzwechsel the Nachbesitzer
or the new user. Thermofloor and Underfloor PV corresponds to the VDI. After
these determinations must be this order always available and will submit
at works at the heating the assembler to the perusal.
Only an admitted expert may execute the installation the Heizmatte.
After resulted installation and starting is to be submitted by the plumber
a Revisionsplan, which is to be preserved carefully with the installation
- and instruction. The Revisionsplan lists, at which places of the room
the Heizmatte transfers and the Fühlerschutzrohr was installed and at which
place the Leistungsschild appropriate ist.Im embarrassed area the Heizmatte
may be brought in no gedübelten screws for any Befestigungszwecke. In the
area of the walls a unbeheizte zone by approx. 50 cm is to be anticipated
width already in the planning, in so far as late closets with vollflächiger
should be found supporting surface there. Further covers e.g. through carpets
with more than 12mm thickness increase the temperatures in the floor and
must be avoided. The dates of performance the Heizbodens are noted by the
assembler at the Innentür of the electric distribution well visibly. To
the content
2. Betriebsfunktion:
A direct underfloor heating is The Heizbodens, which makes possible a quick
warming individual cold Gehbereiche e.g. in kitchens, baths, Saunabereichen
halls or Sitzgruppen. The Heizboden does not serve first of all the Raumheizung
(the required Heizleistung of the room is covered in the normal case by
an other Heizquelle), but only the tempering the cold Fussbodenbereiches.
The temperature is lifted according to outlook only around some Temperaturgrade,
so that the Heizboden consumes only the least time electric current and
is to be pursued thus very sparingly. In the necessity the entire performance
can be claimed also the Heizbodens, in that the regulator becomes according
to hochgestellt. The Heizboden is pasted directly on the cement floor and
sticks only in a 5mm to 10mm thick Klebeschicht and can submit therefore
quickly his warmth at the floor-covering and for a pleasant temperature
in the Fussbereich sorgen.Über an electronic Bodentemperaturregler results
the regulation the Heizbodens. In the Heizebene the antenna is installed
and compares the temperature discontinued at the regulator with the Bodentemperatur.
The Heizboden is switched off according to Wärmeanforderung and the Bodentemperatur
discontinued at the Drehknopf through the regulator a - and. Sonneneinstrahlung,
Wärmegewinn through persons, lighting or other Wärmequellen are recorded
through the regulator and considers. Also the regulator as Frostwächter.Der
serves regulators supervises itself personally, which means at Spannungsausfall,
Fühlerkurzschluss or Fühlerbruch switches off itself the regulation the Heizbodens
selbsständig. To
the content
3. service:
The service the Heizbodens limits itself to the outlook the desired Bodentemperatur
at the Drehknopf of the regulator. The temperature can be discontinued using
the Celsiusgradzahlen easily. The achievable Bodentemperaturen are from the
floor-covering (tiles or cork) and the insulation the cement floor dependent.
Read please also the operating instruction the Reglers.Einen especially energy-saving
organization can reach you through the application a Zeitschaltuhrreglers
(e.g. EB 52527). With this regulator the Heizboden can be switched off after
personal habits to certain times a - and. The Heizbeginn is to be chosen
approx. 30 min (according to Leistungsklasse of the Heizbodens) before the
Benutzungszeit and can be stopped also approx. 30 min before end the Benutzungsdauer.
To
the content
4. Maintenance and disturbance:
A maintenance of the heating is not necessary. In the disturbance you
examine, whether the regulator is discontinued for the heating. At day -
or weeks program, whether the Betriebszeit is discontinued correctly. Put
firmly whether the security or the FI-Schutzschalter have triggered. If no
warming is to ascertain inform you your assembler and submit Him/it the Revisionsplan.
To
the content
5. For the assembler:
The Montageanweisungen are to be considered at the installation.
These orders must be after counting Vde - determinations any time available
and will submit at works at the heating the plumber for the regard. For
that reason we ask you, which Revisionsplan along with this order to surrender
the consumer for the careful storage.
- Heizleiter after DIN owns The Flächenheizelement Thermofloor or
Underfloor PV VDE 0700 and can under observance relevant Installationsvorschriften
in the Innenbereich of living spaces, showers and bathrooms, indoor swimming
pools and damp and/or, wet rooms for the Temperierung of the floor are
installed.
- Only an expert may execute the installation and the connection the
Heizbodens as well as other electric Betriebsmittel. To it is the DIN VDE
0100, to consider part 520 A3.
- Special Installationsnormen count besides at:
- Duschräumen and bathrooms: DIN VDE 0100, part 701.
- Considered swimming pools: DIN VDE 0100, part 702.
- Damp and wet areas: DIN VDE 0100, part 737.
1. The Heizboden is determined using the plain and performance (Watt/m2;)
to be heated.
Verlegeplan in the Grundrissplan einzeichnen (Verlegebahnbreite consider
0,5m or 0,3m).
2. The Heizboden can on each smooth underground like feuchtigkeitsgeschützte
Holzspanplatten or simple cement floor are transferred.
3. attention: If the Heizbodens should be transferred on Heissasphalt,
must it
Heissasphalt approx. 80 C temperaturbeständig be.
4. In Sanitärräumen the plains must them for the installation of status
- Wc, bathtub,
Shower, ect. necessary have be left out. To leading materials must at
least 30mm
Stood off are held.
5. The Heizmatten under closets do not transfer.
6.Heizungsanschlussdose
outside of bath or WC set
(Wandfliesen complicate the accessibility).
7. Necessary plumbing and Leerrohre transfer (see
Anschlussplan).
8. Fühlerschutzrohr under heated acreage install and Flexrohr in Heizungsanschlussdose
introduce.
9. Heizelemente on them to beheitzende acreage explain and adjust.
Durchgangswiderstand, conductivity examine. Important: Under no circumstances
the Heizleiter the Heizmatte shorten.
The Heizmatte always as whole piece transfer.
Never the rolled up Heizmatte heat! Zerstörungsgefahr!!
10. Underground clean and pre-treat. There are allowed to do no sharp
or sharpen elevations
or deepens in the underground be available. The Heizmatte not with nails
or metallic object fasten.
11. At the transfer the Heizmatte these do not squeeze or crack. Not with
Zugbeanspruchung transfer.
12th Paid attention: Under no circumstances the Heizleiter the Heizmatte
cross.
13th Specially - Fliesenkleber (Flexkleber) use and with Zahnspachtel
5mm evenly
direct.
14. Never: The Heizmatte may not cross with Dehnungsfugen in the floor.
15. In the area the Heizmatte no gedübelten screws bring in.
16. The Heizmatte with the smooth Fliesseite after below in the Kleber
bring in and
easily press.
17. Kaltleiterenden and Schutzleiter in the Fliesenkleberbett to the Heizungsanschlussdose
lead and
once more Durchgangswiderstand conductivity examine.
18th Heizungsanschlussdose loudly plan wire.
19. Always as mech. Protection, which Heizmatte with a second layer
Spezialfliesenkleber (Flexkleber) 5mm carefully cover, (important hint,
Flexkleber a
- " little dünnflüssiger"anrühren, it must be ensured, that itself no
air bubbles or
Lufteinschlüsse in the Flexkleber and in the area the Heizmatte under
the tiles can form)
If Natursteinbelag tile or bring in in this Kleberbett, once more
Durchgangswiderstand conductivity examine. Would be the Heizmatte at the
transfer
if one damaged been could remove the Heizmatte now still and against one
undamaged Heizmatte exchange.
20. At the transfer of Parkett,Teppichboden, cork, PVC, ect. Kleberbett
with Glättscheibe
smooth.
21. After two days the erstemal carefully heat. (5 C/Tag)
22. At the transfer of parquet, carpeting, cork, PVC, ect. Undercoat to
it
According to Haftvermittlung the Herstellerangaben use.
23. Heated floor not with carpets the thicker than 12mm are covered (Wärmestaugefahr).
Vollflächige pieces of furniture may not be put on heated plains.
24. Users over the Fliesenheizung einweisen and Revisionsplan with Verlegeplan
submit.
In the electric distribution a reference place, (floor electrically heats.)
just as rooms indicate.
To the content
| 6. Schematic
construction the Heizbodens: |
7.
Example for Transfer and Revisionsplan: |
|
|
|
To
the content
8. It Transfer - and Revisionsplan draw:
Before the Heizmatte transferred will must be noted in the Revisionsplan
(outline) following points.
At which places in the room itself
- the Heizboden
- the Fussbodentemperaturfühler and the course the Fühlerschutzrohr
- the Kaltleiter (phase, Neutralleiter, Schutzleiter) the Heizmatte
find.
- In showers and bathrooms the plains of bathtubs must, Duschwannen,
status - Wc ect. if werden.Von left out leading materials min 30 mm stand
off.
- To walls a distance from 30 cm can be held to 50 cm (depending on
these plains later with vollflächigen pieces of furniture are covered).
After the installation the Revisionsplan is to be submitted the user
in any case for the careful storage.
Outline with Transfer - and Revisonsplan:
To
the content
9. preliminary treatment of the acreage to be heated:
First of all the surface the floor check, whether sharp or pointed elevations
or deepens tower from the floor, which the Heizmatte could damage. If that
should be the case, must to transfer these carefully removes werden.Vor
of the installation the Heizmatten is a Unterputzdose at a favorable place
(in the bath because of the tiles günstigerweise on the outside e.g. in the
passage), in which both the Kaltleiter as well as the Fühlerschutzrohr can
be introduced well. In the Unterputzdose an electric connection with 3x1,5
is to be put mm2; Anschlussleitungen. From the Unterputzdose to the place
at that the electronic Bodentemperaturregler be found should put a Anschlusskabel
with 5x1,5 mm2;.
Attention:
The Kaltleiter are to be introduced without extension in the Unterputzdose,
which Bodentemperaturfühler is to be transferred in a separate Fühlerschutzrohr
Ø 13 mm (at that best immediately antennas and Fühlerschutzrohr together
with each other transfer). The transfer has to result so, that the antenna
is found in the Fühlerschutzrohr directly under the area the later embarrassed
Heizboden in the cement floor (like in the Revisionsplan anticipated).
Kaltleiter the Heizboden and the antenna of the regulator may not be
transferred in the same Leerrohr.
The Bodenfühler of the regulator in the Fühlerschutzrohr introduce and
pay attention to it, that the end of the antenna in the Fühlerschutzrohr
at the following transfer in the area between two Heizleiter are used befindet.Sollte
an open Fühlerschutzrohr, so is to be locked this with a plug, that no
Fliesenkleber can penetrate itself into the reed.
The Fühleranschlussleitungen so transfer, that these cross the Heizleiter
neither nor touch. To
the content
10. Yield the Heizbodens:
With the Heizleiter after above the Heizmatte on the Verlegefäche, according
to the outline and Revisionsplan, yield. With a scissors the Stoffgewebe
can (attention: only the Stoffgewebe not the Heizleiter durchtrennen) are
cut through and are brought so the Heizmatte in the desired Verlegeform. Attention
important: Never the Heizleiter may be shortened the Heizmatte. The Heizleiter
at the durchtrennen the Textilgewebes do not damage.
At the durchtrennten place the Textilgewebes can be bent the Heizleiter
now carefully and are transferred parallel to the first path. The Heizleiter
however do not crack, which totals kleinst possible Biegeradius 20mm.
Also important:
The Heizbahnen the Heizmatte never one on the other transfer. Between
the Heizleitern must be at least a distance from 3cm available.
After this pattern the entire Verlegefläche is explained now with the
Heizmatte.
Attention warranty:
With a gauge the Ohmwert must be determined the Heizmatte (comparisons
with technical data) and in the Revisionsplan as well as in the Stromverteilung
are noted.
The Kaltleiter become, while the Heizmatte is pasted, in which Kleberbett
transfers to the Heizungsanschlussdose and introduced in the Heizungsanschlussdose
(the best in a separate Flexrohr, which leads from the wall - Estrichkante
in the Heizungsanschlussdose).
To
the content
11. Kleber for Heizmatte and Oberbelag:
| At the Verklebung the Heizmatte, the transfer of tiles as well as
as mechanical protection at Oberbelägen like carpets, PVC, cork, ect. if
Flexkleber suit, which are to maximum 80 C temperaturbeständig. |
1. Kleber for Heizmatten and ceramic disks (tiles) or Natursteinplatten:
PCI-Flexmörtel Specially - Fliesenkleber for balcony, terrace and underfloor
heating
Kleberbettdicke to maximum 5mm, from -20C to 80C, drying time approx.
4-5 hours.
Pci - Flexmörtel - Quickly Specially - Fliesenkleber for balcony, terrace
and underfloor heating
Kleberbettdicke to maximum 5mm, from -20C to 80C, drying time approx.
2-3 hours
or products of Knauf (ask you your Knauffachhändler)
2. Trittschutz at Oberbelägen, carpet, PVC, cork ect.
Around at the transfer of carpets, PVC, cork ect. a mechanical protection
to guarantee, must be covered the Heizmatte with a protective layer by
5 to 10 mm.
We recommend:
PCI-Periplan 10 to 10mm Schichtstärke
PCI-Periplan 20 to 20mm Schichtstärke
While the entire transfer examine with a gauge, whether the Heizmatte
is still conductive (Ohmwerte loudly technical data) To
the content
12th pasting the Heizmatten:
At the transfer of tiles and natural stones:
The instructions the Kleberherstellers are at the processing exact to
consider.
The Kleber is directed with a Zahnkelle (3-4 mm) on the floor. In this
Kleberbett the Heizmatte is inserted with the Heizleiter after above (smooth
page after below) and pressed with a Glättscheibe carefully. The durchgedrückten
Kleber carefully glattziehen. After that the upper side is covered the Heizmatte
once more with a layer of (Zahnspachtel 4-6 mm) Specially - Flexkleber, in
which directly the tiles or the natural stone is put. At the transfer on
it pay attention, that the Temperaturfühler comes between two Heizleitern
(loudly Revisionsplan) for the lying. The Kaltleiter just on the floor in
the Kleberbett to the Heizungsanschlussdose transfer and introduce through
a prepared Flexrohr in the Heizungsanschlussdose.
At the Verfugen of the tiles Flexfugenmasse use.
At the transfer of Oberbelägen like carpeting, PVC, cork, parquet:
After the Heizmatte was brought in described how above, and with a second
layer Specially - Flexkleber was covered, this mechanical protective layer
with the Glättscheibe must become cautious glattgezogen. If necessary
can be covered after 24 hours these dry Kleberfläche once more, with it
the surface smooth and even becomes (PCI-Periplan). The Verarbeitungshinweise
of the respective fillers - maker are exact to consider.
The preliminary treatment of the surface hangs from the further application
the special Kleber
z. B. from cork, PVC, parquet or carpeting from. An undercoat for the
consolidation, Haftverbesserung should be anticipated in any case as underground
- preliminary treatment.
At the earliest after three days the Oberbeläge can be begun according
to damps in the underground with the transfer.
Only for underfloor heating suitable Oberbeläge use.
To consider are following values for the warmth - Leitwerte:
- -Wert = 0,14 W/(m.K) at parquet maximum 16mm thickly
- -Wert = 0,09 W/(m.K) at carpeting maximum 20mm thickly
- -Wert = 0,08 W/(m.K) at cork maximum 10mm thickly
- -Wert = 0,23 W/(m.K) at PVC maximum 10mm thickly
- -Wert = 1,00 W/(m.K) at tiles maximum 30mm thickly
- -Wert = 1,00 W/(m.K) at natural stone maximum 30mm thickly
Attention:
The Heizleiter may not touch the Kaltleiter and do not cross also.
While the entire transfer examine the Ohmwerte and compare with the
first measurement...
At a damage the Heizmatte is recognized this immediately and the damaged
Heizmatte can be exchanged against a sound Heizmatte.
The room mark, that the Handwerkerkollegen are informed about the electric
underfloor heating. To
the content
13th electrics connection:
Only by an admitted expert the electric connection may be executed the
Heizmatte after the counting Vde - instructions and the Montageanweisung.
The Heizboden must be connected electrically so, that allpolig totals
the Kontaktöffnungsweite at least 3mm of the net. Ls - Switch, securities
and marksman in the distributor are suitable Trennvorrichtungen. The instructions
the local EVU are to be considered. Also a FI-Schutzschalter with 30 mA
should find in the Heizstromkreis application, to guarantee especially in
showers and baths the protection and the safety against dangerous Körperströme
(normally extend it from if the apartment is furnished or at least the Badezimmerverteilung,
from which the Heizstrom originates, with a Fi - protection). The Heizbodens
according to the circuit diagrams connect. To a flawless connection the Schutzleiters
(gelb/grün) pay attention. There can be connected several Heizböden to an
electronic thermostat. It in the technical data indicated maximum Schaltstrom
and/or Schaltleistung is to be considered.
To
the content
14. Circuit diagrams:
z. B: Leitungsverlegung:
After the work: After the works finished is must be placed in the Verteilerschrank
a Leistungsschild with entered Ohmwert at well visible place. In the Revisionsplan
these Verteilerplatz note and the user this installation and instruction
for the careful storage übergebenInbetriebnahme: After 48 hours the Heizmatte
can be heated the first times carefully (5 C/Tag)
Leitungsverdrahtung: EB 52521 Leitungsverdrahtung: EB 52527 / 28
To
the content
Technical data: Messprotokoll:
| Kind - No: |
Performance:
Watt/Stück |
Measured:
L x B in m |
Flat:
m2; |
Ohmwert /
Heizmatte
approx. |
Tension:
1/N/PE |
DreiMesswerte:
per rooms:
Ohm |
| Thermofloor 2000 S or Underfloor PV/5 160 watt /m2; |
| TF2S16/UPV160 |
160 watt |
3,3x0,3 |
1 |
330 Ohm |
230V/50Hz |
|
| TF2S26/UPV260 |
320 watt |
6,7x0,3 |
2 |
165 Ohm |
230V/50Hz |
|
| TF2S36/UPV360 |
480 watt |
10,0x0,3 |
3 |
110 Ohm |
230V/50Hz |
|
| TF2S46/UPV460 |
640 watt |
13,3x0,3 |
4 |
82 Ohm |
230V/50Hz |
|
| TF2S56/UPV480 |
800 watt |
16,7x0,3 |
5 |
66 Ohm |
230V/50Hz |
|
| Thermofloor 2000 S or Underfloor PV/5 130 watt /m2; |
| TF2S53/UPV530 |
650 watt |
10x0,5 |
5 |
81 Ohm |
230V/50Hz |
|
| TF2S63/UPV630 |
780 watt |
12x0,5 |
6 |
68 Ohm |
230V/50Hz |
|
| TF2S73/UPV730 |
910 watt |
14x0,5 |
7 |
58 Ohm |
230V/50Hz |
|
| TF2S83/UPV830 |
1040Watt |
16x0,5 |
8 |
51 Ohm |
230V/50Hz |
|
| TF2S93/UPV930 |
1170Watt |
18x0,5 |
9 |
45 Ohm |
230V/50Hz |
|
| Thermofloor 2000 S or Underfloor PV/5 100 watt /m2; |
| TF2S10/UPV100 |
100 watt |
2x0,5 |
1 |
530 Ohm |
230V/50Hz |
|
| TF2S20/UPV200 |
200 watt |
4x0,5 |
2 |
264 Ohm |
230V/50Hz |
|
| TF2S30/UPV300 |
300 watt |
6x0,5 |
3 |
176 Ohm |
230V/50Hz |
|
| TF2S40/UPV400 |
400 watt |
8x0,5 |
4 |
132 Ohm |
230V/50Hz |
|
| TF2S50/UPV500 |
500 watt |
10x0,5 |
5 |
106 Ohm |
230V/50Hz |
|
| TF2S60/UPV600 |
600 watt |
12x0,5 |
6 |
88 Ohm |
230V/50Hz |
|
| Thermofloor S 160 watt /m2; |
| TFS116 |
160 watt |
2x0,5 |
1 |
330 Ohm |
230V/50Hz |
|
| TFS216 |
320 watt |
4x0,5 |
2 |
165 Ohm |
230V/50Hz |
|
| TFS316 |
480 watt |
6x0,5 |
3 |
110 Ohm |
230V/50Hz |
|
| TFS416 |
640 watt |
8x0,5 |
4 |
82 Ohm |
230V/50Hz |
|
| TFS516 |
800Watt |
10x0,5 |
5 |
66 Ohm |
230V/50Hz |
|
| TFS616 |
960Watt |
12x0,5 |
6 |
55 Ohm |
230V/50Hz |
|
Technical data:Eberle 52527 / 28
Back
Bestellblatt:
To the order you click Produktnamen in the dunkelblauen
Anzeigefeld and choose on the right the Produktkategorie from choose you
the products through it - " orders " - Button. The products will print then
automatically in the Auswahlmenü - " Faxbestellung " - on the left below
transfer that you from and then fax or can send with the post.
| Kind - No: |
Performance:
Watt/Stück |
Measured:
Long x B
in m |
Flat:
m2; |
ordered piece: |
Preis:DM |
Gesamt:DM |
Thermofloor 2000 S or Underfloor PV 160 watt /m2; width 30 cm
| TF2S16/UPV160 |
160 watt |
3,3x0,3 |
1m2; |
|
|
|
| TF2S26/UPV260 |
320 watt |
6,7x0,3 |
2m2; |
|
|
|
| TF2S36/UPV360 |
480 watt |
10,0x0,3 |
3m2; |
|
|
|
| TF2S46/UPV460 |
640 watt |
13,3x0,3 |
4m2; |
|
|
|
|
800 watt |
16,7x0,3 |
5 m2; |
|
|
|
Thermofloor 2000 S or Underfloor PV 130 watt /m2; width 50 cm
| TF2S53/UPV530 |
650 watt |
10x0,5 |
5m2; |
|
|
|
| TF2S63/UPV630 |
780 watt |
12x0,5 |
6m2; |
|
|
|
| TF2S73/UPV730 |
910 watt |
14x0,5 |
7m2; |
|
|
|
| TF2S83/UPV830 |
1040Watt |
16x0,5 |
8m2; |
|
|
|
| TF2S93/UPV930 |
1170Watt |
18x0,5 |
9m2; |
|
|
|
Thermofloor 2000 S or Underfloor PV 100 watt /m2; width 50 cm
| TF2S10/UPV100 |
100 watt |
2x0,5 |
1m2; |
|
|
|
| TF2S20/UPV200 |
200 watt |
4x0,5 |
2m2; |
|
|
|
| TF2S30/UPV300 |
300 watt |
6x0,5 |
3m2; |
|
|
|
| TF2S40/UPV400 |
400 watt |
8x0,5 |
4m2; |
|
|
|
| TF2S50/UPV500 |
500 watt |
10x0,5 |
5m2; |
|
|
|
| TF2S60/UPV600 |
600 watt |
12x0,5 |
6m2; |
|
|
|
Thermofloor S 160 watt /m2; width 50 cm
| TFS1 |
160 watt |
2x0,5 |
1m2; |
|
|
|
| TFS2 |
320 watt |
4x0,5 |
2m2; |
|
|
|
| TFS3 |
480 watt |
6x0,5 |
3m2; |
|
|
|
| TFS4 |
640 watt |
8x0,5 |
4m2; |
|
|
|
| TFS5 |
800Watt |
10x0,5 |
5m2; |
|
|
|
| TFS6 |
960Watt |
12x0,5 |
6m2; |
|
|
|
Regulators & Installationsset for Thermofloor S & 2000S as well
as Underfloor PV
| EB 52527 |
El. -Temperaturregler with Bodenfühler
Tageszeitschaltuhr |
|
|
|
| EB 52528 |
El - Thermostat with Bodenfühler
Wochenzeitschaltuhr |
|
|
|
| EB 52521 |
El - Thermostat with Bodenfühler |
|
|
|
| Instset |
UP.Anschlussdose 100x100
Fühlerschutzrohr 1m & 2x Flexrohr |
|
|
|
Address or stamps with signature:
Endpreis: |
Fliesenh
Electrical
underfloor heating
Electrical
undertile heating
Electrical
thin-bed underfloor undertile heating
Electric under
floor heating
Electric under
tile heating
Electric thin-bed
under floor heating under tile heating
eizung Elektroheizung
electric Wärmeboden floor heating system Heizboden Heizmatten heat warm
bath kitchen Kinderzimmer tiles stone floor cold feet Trockenboden Altbausanierung
Ferkelaufzucht Fliesenkleber Eberle Tekmar Termostat
electric underfloor heating Fliesenheizung
floor heating system Heizmatten Wärmeboden Badheizung Temperierung Speicherheizung
bath tiles Elektroheizung Flächenheizung Wintergarten frostschutz Eberle
Heizboden Dünnbrettheizmatten Altbausanierung Trockenboden warmth cold feet
Fuesse parquet Fliesenkleber Bodentemperierelemente 48V renovating Zeitschaltuhr
Fliese
Look at!
Underfloor Heating
Overview of FH, FH-TWIN THERMOFLOOR and WARMTOUCH
The high quality heating mats:
|
Warmtouch WT PV-S-10N
Woven fabric, height 3mm
|
ThermofloorS
Woven fabric, height 3.5mm
|
|
FH-TWIN
Reinforced fabric, height 2mm FH-TWIN
2.5mm
|
Warmtouch WT PV-3L-5N
Woven fabric, height 3mm
|
What are FH, FH-TWIN, Thermofloor and
Warmtouch?
The heating wire is wound into a woven or a reinforced
fabric.
The heating wire has a diameter of only 3 or 4 mm, is
moisture-resistant, totally insulated and is sheathed in a protective wire
mesh; it is made from a high quality resistance alloy.
4m long PTC resistor connection leads (neutral/PE, phase,
PE) made from tin-plated copper are attached at the beginning and end of
each heating mat.
The connecting sleeves are absolutely watertight, strain
relieved and can also withstand high temperatures (80°C).
The heating mats can be laid flat on the floor base with
no bulges as a result of the highly flexible fabric weave.
The heating mats are available in two different lengths,
0.3m and 0.5m, suitable for different floor sizes.
The 120 Watt/m² version is designed for heating carpeted,
PVC or parquet floors, whereas the 160 Watt/m² or 120 Watt/m² version is
suitable for tiles and stone floor coverings. 160 Watt/m² or 200 Watt/m²
heating mats are designed for use in conservatories and in the bathroom.
120 Watt/m² heating mats are most appropriate for taking
the chill evenly off larger living areas (or e.g. for Fermacell, Soporo,
Majestic or Wedi boards).
Page 2
Laying examples:
The heating mats can be laid on any smooth underfloor
surface such as concrete, moisture-resistant chipboard or dryfloor covering
(as often used in the redevelopment of older buildings).
Follow the instructions for positioning and laying ceramic
tiles and boards on chipboard issued by the German Tile Industry Guild
(or equivalent).
It should be noted that even hot or poured asphalt can
only withstand temperatures of 80°C.
The heating elements are very flexible when laying. The
wound pattern of the heating wires means that there is a wide variety of
laying possibilities. Maximum adaptation is possible for the most diverse
range of floor layouts (with two laying widths: 0.3 and 0.5 m).
By cutting the fabric weave with a pair of household scissors,
the heating elements can easily be adapted to the required outline as shown
in the laying plan.
The sensor protection tube now needs to be laid so that
the sensor can be fed from the heating connection box into the protection
tube and laid beneath the heated area.
After this you can start to lay the cut-to-size heating
mats on the dry, smooth and dust-free ground using a heat-resistant (80°C)
tile adhesive from Knauf or PCI.
Press the heating mat with heating wire into the adhesive,
ensuring that the heating wires do not touch or overlap.
It is extremely important that the heating mat is applied
evenly without trapping any air beneath it. Lay the decking surface using
tile adhesive, smoothing it down to provide mechanical protection when
laying cork, PVC etc.
Page 3
Electrical connections in the UP heating connection box:
The electrical fitting of the underfloor heating should
be undertaken by a certified electrician in accordance with the current
VDE regulations and these fitting instructions.
The volume resistance (conductivity) of the heating mat
should be measured continuously during the entire fitting procedure.
The continuous measurement of the volume resistance ensures
that any damage to the heating mat is detected immediately and that the
damaged item can then be exchanged for a fully functioning one.
The Ohm value of each mat should be entered in the room
layout plan and on the rating plate (junction box).
The heating circuit should also feature a 30 mA circuit
breaker, especially in showers and bathrooms, to ensure protection and
safety against dangerous electrical shocks (unless the apartment as a whole,
or at least the bathroom junction box from where the heating current originates,
is fitted with a circuit breaker).
The connection leads of the heating mat and the temperature
sensor routed into the embedded junction box should be connected as per
the circuit diagram below. Make sure the PE wire (yellow/green) is properly
connected.
Multiple heating mats should only be connected in parallel.
Temperature regulation:
EB 52531
The floor temperature is measured by the NTC sensor and
regulated by means of the EB 52531 electronic thermostat. The sensor
of the thermostat is laid in the floor beneath the heating wires in the sensor
protection tube, directly beneath the heating layer. The floor temperature
can be set on the thermostat to meet your personal requirements
and those of the particular room (living room or bathroom).
EB EASY 3 ft EB 52535 OJ OTN & OCC2/D2
Timed operation by the EASY 3 ft (daily timer
switching) or EB 52535, or OCC2/D2 (daily and weekly timer switching)
timer thermostats is highly economical, yet there is no loss of
comfort or convenience. The electronic thermostat should be set so
that it automatically switches on the heating 30 minutes before the
room is to be used. The unit switches off again automatically during
or after use, preventing any unnecessary heating. You can also switch
the heating on and off outside the times set on the timer, of course.
Page 4
|
Example of cable laying:
|
Example of wiring:
|
Full instructions for assembly and operating are enclosed with each delivery.
|
Applications:
* Tiled stove heating
* Bathroom, kitchen, nursery
* Selling areas, e.g. butchers
* Offices
* Low raised floor height
* Aesthetic reasons (no radiators)
* Renovation of old buildings (e.g. dry floors)
* Partial floor heating for seating area
* Conservatory frost protection
|
Advantages:
* Quick and easy to lay
* Rapid heating to desired temperature (bathroom in morning)
* Controlled by timer thermostat
* Extremely thin heating mats, 3 mm and 4 mm thick
* Safe, low-cost, maintenance-free
* Conforms to international standards
* Warm feet, cool head
* Pleasant house temperature
* Lower temperature possible through high heat radiation
|
Please read carefully - important for understanding floor heating:
Heating and electricity consumption
If 160 Watt/m² floor heating is fitted in a room with floor tiles, the
heating only consumes 160 Watt/m² during the warm-up period, e.g. from
18°C to the target floor temperature of 24°C. At 160 Watt/m² rating this
is of course correspondingly faster than 120 Watt/m² - and you save time
in the warm-up phase. Subsequently the floor heating, i.e. from the surface
of the floor tiles, only releases approx. 10 Watt/m² heating power into
the room for each degree Celsius warmer than the room itself. Roughly half
of the heat is released into the room in the form of infrared heat, i.e.
radiant heat.
If the temperature in the room is 22°C and the floor is 24°C, the floor
heating would then only release 20 Watt/m² into the room. If the room is
warmed e.g. by the sun to 24°C, the floor heating will release no more heat
at all into the room and therefore not consume any more electricity. This
is the self-regulation effect of floor heating. The high percentage of radiant
heat in floor heating means that the room temperature can easily be turned
down by several degrees to e.g. 20°C, and it will still be perceived as pleasantly
warm. A floor temperature of 21°C is felt as warm (the emphasis here is
on the feeling of comfort created by floor heating - the prime source of
heating is e.g. radiators). In this case the floor heating would only release
10 Watt/m² into the room.
With a heating area of e.g. 10 m² and a rating of 10 Watt/m² this would
result in electricity costs of 15 cents for 10 hours at a price of 15 cents/kwh.
This assumes adequate thermal insulation beneath the floor base.
In an extreme case, a 160 Watt/m² floor heating system would heat a room
from 20°C to 36°C (i.e. one degree per 10 Watts) if it were not limited
by the thermostat to approx. 28-29°C.
If the floor plate is thick enough, e.g. 8cm (e.g. heating base from Knauf)
and if the customer has access to suitably low-cost storage heating electricity,
it is also possible to heat an entire apartment or individual rooms with
night storage underfloor heating. The investment costs are relatively low.
If the intention is to use the underfloor system as the main source of heating,
it is important to use night storage current or, better still, to change
to a night-heating tariff.
The consumption costs are …, i.e. one litre of heating oil provides 10kW/h
of chemical energy although only 80-90% is actually used as heat in the
flat (boiler, radiation and chimney losses). In the case of electricity,
however, 100% is given up to the floor surface. And there are no costs for
chimney sweeps, boiler maintenance or fume emission measurement.
nh
Electrical
underfloor heating
Electrical
undertile heating
Electrical
thin-bed underfloor undertile heating
Electric under
floor heating
Electric under
tile heating
Electric thin-bed
under floor heating under tile heating
Easy Electric thin-bed
under floor heating under tile heating
UNDERFLOOR HEATING UNDER
TILE HEATING UNDERFLOOR TILE
Underfloor Heating Conservatory wintergarden
Heating technology UnderFloor
heating Heating engineering Building technology Installation
Floor heating Electric floor
heating Electrical floor heating Electric thin-bed heating mats Tile heating
Bathroom heating Thin-bed heating Electric heating Parquet heating Laminate
heating Foot heating mat Raychem
Pipe heating systems, Heating band,
Frost protection band, Guttering heating band, Warm water heating band,
Temperature maintenance band, Heating band, Warmth retaining band, Temperature
maintenance, CO-heating, Facade heating,Thorin & Thorin, Tyco Thermal
Controls, T2 Quicknet, T2, Floortemp, DigiTemp, Ramp heating, Facade
heating band, Heating band, Hot water heating, Guttering heating, Guttering
co-heating, Drainpipe heating, Drain pipe co-heating, Gutter co-heating
band, Drain heating, Grease heating, Sink drain heating, Grease drain
coheating band, Sink drain co-heating band
Electrical
T2 TC TA FloorTemp DigiTemp PLUS QuickNet
eizung Elektroheizung
electric Wärmeboden floor heating system Heizboden Heizmatten heat warm
bath kitchen Kinderzimmer tiles stone floor cold feet Trockenboden Altbausanierung
Ferkelaufzucht Fliesenkleber Eberle Tekmar Termostat
electric underfloor heating Fliesenheizung
floor heating system Heizmatten Wärmeboden Badheizung Temperierung Speicherheizung
bath tiles Elektroheizung Flächenheizung Wintergarten frostschutz Eberle
Heizboden Dünnbrettheizmatten Altbausanierung Trockenboden warmth cold feet
Fuesse parquet Fliesenkleber Bodentemperierelemente 48V renovating Zeitschaltuhr
Fliese
Look at!
Undertile Heating
Look at!
Underfloor Heating
Fitting guide
and
Instructions for use
HEATING MATS
With floor thermostat and Instset
Contents:
Fitting guide and instructions for use:
|
1. Information for users:
|
Page 1
|
|
1.1 Heating mats should only be fitted by registered
craftsmen:
|
Page 1
|
|
1.2 Functioning:
|
Page 1
|
|
1.3 Operation:
|
Page 2
|
|
1.4 Maintenance and malfunctions:
|
Page 2
|
|
2. For fitters:
|
Page 3
|
|
2.1 Installation instructions:
|
Page 3
|
|
2.2 Schematic diagram of the underfloor heating:
|
Page 5
|
|
2.3 Drawing the laying and room layout plan:
|
Page 5
|
|
2.4 Room layout plan showing laying diagrams:
|
Page 6
|
|
2.5 Preparation of the floor area to be heated:
|
Page 6
|
|
2.6 Laying out the floor heating:
|
Page 7
|
|
2.7 Adhesive for heating mat and decking:
|
Page 8
|
|
2.8 Covering the floor heating:
|
Page 8
|
|
3. Electrical connections:
|
Page 10
|
|
3.1 Circuit diagrams:
|
Page 10
|
|
4. Technical Data:
|
Page 11
|
|
4.1 Measurement record:
|
Page 11
|
|
4.2 Large-scale circuit diagrams
|
Page 12
|
Fitting guide and instructions for use:
1. Information for users:
- Please store the instructions in a safe place and pass them to the
next owner or new user when you move.
- The heating mats are built to VDI standards. These state that these
instructions should always be available and should be presented to the technician
in the event of work being carried out on the heating.
1.1 Thermofloor should only be fitted by authorised craftsmen:
- Once the elements have been fitted and put into operation,
the fitter should hand over a room layout plan which should be stored carefully
together with the fitting guide and instructions for use.
The room layout plan details in which parts of the room the underfloor
heating and the sensor protection tube have been installed and where the
rating plate is mounted.
No plugged screws should be used for fastening purposes in the area
containing the underfloor heating.
- An unheated zone of around 50 cm should be planned in around
the walls if cupboards with full, flat bases are to be stood there later.
Other coverings, e.g. carpets, with a thickness of more than 12mm
raise the temperature in the floor and should be avoided.
- The rating data of the underfloor heating should be clearly
displayed by the fitter on the inner door of the electrical junction box.
|
1.2 Functioning:
- The floor heating is a direct underfloor heating system which
permits rapid warming of particular cold floor areas, e.g. in kitchens, bathrooms,
saunas, hallways or around seating areas.
These heating mats are not intended
as the principal source of room heating (the required heating is normally
provided by another heating source), rather they are designed simply to take
the chill off cold floor surfaces.
- Depending on the setting, the temperature is generally only
raised by a few degrees meaning that the floor heating only consumes electricity
for a very short period, making it highly economical to run. In exceptional
cases the entire output of the floor heating can be exploited by turning
the thermostat up high.
- The heating mat is laid directly onto the concrete floor and
is contained in a thin 5 to 10mm adhesive layer, allowing it to release its
heat quickly to the floor surface and create a pleasant floor temperature.
- The floor heating is regulated by an electronic floor thermostat.
The sensor is installed in the heating layer and compares the thermostat
setting with the floor temperature.
The thermostat switches on and off depending on the
heat setting and the floor temperature.
Sunshine, heat generated by people, lighting or other
heat sources are detected by the thermostat and taken into account. The thermostat
also serves as a frost safeguard.
- The thermostat is self-monitoring, i.e. it automatically switches
off the floor heating in the event of a power cut, a short-circuit in the
sensor or damage to it.
|
Page 2
1.3 Operation:
- Operation of the floor heating is limited to
setting the desired floor temperature on the thermostat knob.
The temperature is easy to select
using the Celsius scale.
The floor temperatures which can be
achieved depend on the floor covering (tiles or cork) and the thermal insulation
of the concrete base. See also the operating instructions of the thermostat.
- The system can be made even more energy-efficient
by using a timer thermostat (e.g. EB 52527, or preferably EB 52512).
This type of thermostat allows the
floor heating to be switched on and off at set times to suit your own personal
habits.
- The heating period should be set to come on
roughly 30 minutes before actual use (depending on the rating of the heating
system) and should also be set to switch off roughly 30 minutes before the
end of the usage period.
|
1.4 Maintenance and malfunctions:
- No maintenance is necessary for the heating system.
- In the event of a malfunction, check whether the thermostat
is set to heating.
- When using a daily or weekly program, ensure that the operating
times are correctly set.
- Check whether a fuse has blown or the current breaker has tripped.
- If there is still no heating, contact your fitter and present
him the room layout plan.
|
|
Appendix:
The 100x100 connection box should be installed at
a height of approx. 30 cm at the point at which the PTC resistor leads of
the heating mat and the sensor lead reach the wall.
If a number of heating mats are to be installed in
a room these can be connected in parallel in the 100x100 connection box.
If many heating mats are to be laid in a room, meaning
that the maximum breaking capacity of the floor thermostat is exceeded,
then the "thumb-size" 16 Amp relay should be included in the 100x100 connection
box.
If only one heating mat is to be laid, e.g. in the
bathroom, you may consider omitting the 100x100 connection box and routing
the PTC resistor and the sensor leads directly up to the floor thermostat.
We recommend fitting the 100x100 connection box at
a height of 30 cm. This enables a new sensor to be inserted if it has to
be exchanged.
If no 100x100 connection box is fitted and the new
sensor lead has to be inserted from right at the top (floor thermostat positioned
at height of 1.3 m), the sensor lead touches the wall so often in the empty
tube (straight down to the floor) that no force is required to push it
around the 90° section into the horizontal floor level until it comes out
right at the front beneath the heating mats.
You can therefore pull out the old sensor lead, but
not insert the new one.
If, however, the 100x100 connection box is installed
at a height of 30 cm it is then simpler to reinsert the sensor if it has
to be exchanged.
In tiled rooms (bathroom, shower, etc.), the 100x100
connection box can be fitted on the other side of the wall (hall, landing
etc.), thereby leaving the bathroom wall intact. The flexitube is used here
as it provides a connection straight through the wall.
|
Page 3
2. For fitters:
|
Follow the instructions carefully when fitting.
- VDE regulations stipulate that these instructions should always
be available and should be presented to the technician in the event of work
being carried out on the heating. You should therefore always hand over the
room layout plan and these instructions to the customer for safekeeping.
- The heating mats contain VDE 0700 heating wires and may be
installed in indoor living areas, showers and bathrooms, swimming pools
and humid or wet areas for warming the floor - following the appropriate
installation instructions.
- Only a trained craftsman should carry out fitting and connection
of the floor heating and other electrical equipment. DIN VDE 0100 part 520
A3 should be observed here.
¾ Special installation
standards also exist for:
¾ Shower rooms and bathrooms:
DIN VDE 0100, part 701.
¾ Indoor swimming pools:
DIN VDE 0100, part 702.
¾ Humid and wet areas:
DIN VDE 0100, part 737.
- Installation instructions:
- Select the heating mats on the basis of the area to be heated
and the power rating (Watt/m²). Draw the laying plan into the room layout
plan (NB. note width of strips - 0.5 or 0.3 m).
- The floor heating can be laid on any flat surface such as damp-proof
chipboard or a simple concrete surface.
3. Note: If the floor heating is to be laid on hot-rolled
asphalt, the asphalt should be able to withstand temperatures of roughly
80°C.
4. In sanitation facilities, the areas needed for fitting a floor-mounted
toilet, bath, shower unit etc should be worked around. A distance of at
least 30mm should be maintained to conducting materials.
5. The heating mat does not need to be installed
under fitted cupboards.
6. Position the heating connection box outside the
bathroom or toilet (wall tiles make access more difficult).
7. Lay all necessary cabling and empty ducts (see
connection diagram).
- Fit the sensor protection tube beneath the heated floor surface
and feed the flexitube (PVC section) into the heating connection box. If
the heating mat is too long it can be evenly compressed by 10-15% lengthways,
if necessary, e.g. from 2m down to 1.7m. Heating conductors should never
be laid on top of or right next to each other. The performance per area
then increases correspondingly by 10-15%.
Page 4
- Lay out the heating elements on the floor surface to be
heated, and make necessary adjustments. Check the volume resistance and
conductivity and note these in the measurement report.
IMPORTANT: Under no circumstances should the heating wires of the
heating mat be shortened.
The heating mats should always be laid as entire units.
Never heat the heating mat when rolled up. Risk of total damage!!
10. Clean the floor surface and pre-treat with deep
solvent primer. There should be no excessive elevations or depressions
in the floor. Do not fasten down the floor heating with nails or other
metal objects.
11. Take care not to crush or crease the heating
mats when laying them. Avoid pulling them too tight.
12. NB. Under no circumstances should the heating conductors of
the heating mat be crossed.
13. Use special tile adhesive (flexible adhesive), applying an even
5mm layer with a spreader.
14. Caution. The heating mat should never cross expansion joints
in the floor.
15. Do not use any plug screws around the floor heating.
16. Apply the heating mat to the adhesive with the smooth tile side
facing downwards and press down gently.
- Lay the ends of the PTC resistor and PE wires in the tile adhesive
bed to the heating connection box and check the volume resistance and
conductivity again, noting the result in the measurement report. Wire
the heating connection socket as per diagram. When connecting the PTC resistors
(phase and neutral conductor), take care not to confuse the PTC resistors
with the yellow/green PE lead (the outer protective wire mesh of the PTC
resistor is approx. 6 Ohm). Take care when shortening or extending the
PTC resistors. After lengthening a PTC resistor, 2 separate cables
should continue from the connection or extension point (i.e. the PTC resistor
and the yellow-green PE). Instead of laboriously lengthening
the PTC resistor (approx. 1 - 1.5m) it is also possible to use "heater strips"
at the end of the heating mat for the extension by removing the cotton mesh
and utilising the heating wire to extend the PTC resistor. Care
is required here, however, as the heating wire must be embedded in
flexible tile adhesive up to the shrink sleeve (in which the heating wire
is connected to the PTC resistor). Ensure that the heating wire can release
its heat to the flexible tile adhesive coating at least up to the sleeve.
It is crucial for the heating wire (or cable) can release its
heat to the flexible adhesive material. Under no circumstances should
the PTC resistor sleeve heating wire be pulled into a empty flexitube where
it could overheat and become damaged. Note: Multiple heating mats should
only be connected in parallel and not in series.
19. For mechanical protection, always carefully cover the floor heating
with a second 5mm layer of special tile adhesive (flexible adhesive).
Important: make up the flexible adhesive a little thinner, ensuring
that there are no bubbles or hollows in it and that none can form around
the heating mat beneath the tiles. Apply the tiles or natural stone covering
to this adhesive bed and then check the volume resistance and conductivity
again. If the heating wire has been damaged during the laying, it would
still be possible to remove the heating mat at this stage and replace it
with an undamaged one.
20. When laying parquet, carpet, cork, PVC etc, smooth the adhesive
bed with a smoothing disc.
21. Wait two days before carefully heating for the first time. (5°C/day)
22. When laying parquet, carpet, cork, PVC etc, use a primary coat
as a bonding agent. Follow the manufacturer's instructions.
23. Do not cover heated floors with carpets which are thicker than
12mm (risk of heat accumulation). Items of furniture with flat, solid bases
should not be stood on heated surfaces.
24. Instruct the owners on how to use the floor heating and hand
over the room layout plan together with the laying diagram. Display a note
in the electrical junction box (electrical underfloor heating), specifying
which rooms are heated.
|
Page 5
|
2.2 Schematic diagram of the underfloor heating:
|
Example of laying and room layout plan:
|
2.3 Drawing the laying and room layout plan:
- Before laying the heating mat, the following points should
be noted on the room lyout plan.
The points in the room in which the following are
located:
- the underfloor heating
- the floor thermostat and the routing of the sensor protection
tube
- the PTC resistors (phase, neutral, PE conductors) of the heating
mat.
- In showers and bathrooms the areas to be occupied by bathtubs,
shower cubicles, floor-mounted toilets etc should be left free. Leave a minimum
gap of 30 mm to conducting materials. A distance of 30 to 50 cm can be left
to the walls (depending on if these areas are to be covered later with flat-based
floor-standing furniture).
After installation, the room layout plan should
then be handed over to the owner for safekeeping.
|
Page 6
2.4 Room layout plan showing laying diagrams:
2.5 Preparation of the floor area to be heated:
|
- First check the floor surface to make sure there are no excessive
elevations or depressions which could damage the heating mat. If there are
any, they should be carefully removed.
- Before fitting the heating mat, an embedded
junction box should be mounted in a suitable position (typically in the
hall outside the bathroom, due to the tiles), into which both the PTC resistors
and the sensor protection tube can easily be fed. An electrical connection
with 3x1.5 mm² connection leads should be laid into the embedded junction
box. Lay a 5x1.5 mm² connection cable from the embedded junction box to the
place whether the electronic floor thermostat is to be fitted.
Feed the PTC resistors into the embedded box;
the floor thermostat should be laid in a separate Ø 13 mm sensor protection
tube (it is best to lay the sensor and the sensor protection tube at the
same time). The sensor and sensor protection tube should be laid on the concrete
so that it is directly beneath the area which will later be covered by the
floor heating
(as shown in room layout plan).
The PTC resistor leads of the floor heating and
the thermostat sensor should not be laid in the same conduit.
Page 7
- Feed the thermostat floor sensor into the sensor protection
tube and ensure that the end of the sensor (in the tube) is between two heating
wires when you lay the mats afterwards.
If an open sensor protection tube is used, this should
be sealed with a plug to ensure that no tile adhesive can enter.
- Lay the sensor leads so that neither cross nor touch the
heating wires.
|
2.6 Laying out the floor heating:
- With the heating wire on top, spread out the heating mat in
the laying area as per the room layout plan. The fabric can be cut to the
required shape using scissors (Caution: only cut the fabric and not the
heating wire).
The heating wire of the underfloor heating should
never be shortened. Take care not to damage the heating wire when cutting
the fabric.
|
- At the point where the fabric has been cut, the heating wire
can now be carefully bent and laid parallel to the first strip. Do not fold
the heating wire, however; the minimum bending radius is 20 mm.
Never lay the heating strips on top of each other.
There should always be a minimum distance of 3 cm between the heating wires.
The heating mats should be laid over the entire area
in the same way.
Measure the conductivity of the heating mat using
a multitester (see technical specifications) and note the reading on the
room layout plan and in the junction box.
- Important: Multiple heating mats should only be connected
in parallel and not in series.
During laying of the floor heating, the PTC resistors
should be laid in the adhesive bed and fed to the heating connection box
(preferably in a separate flexitube leading from the wall corner to the
heating connection box).
|
Page 8
2.7 Adhesive for heating mat and decking:
- Flexible adhesives which are heat resistant up to 80°C are
suitable for holding the heating mat and laying the tiles. They also offer
mechanical protection when using floorings such as carpet, PVC, cork etc.
- A. Adhesive for heating mats and ceramic plates (tiles)
or natural stone plates:
PCI-Flexmörtel, special tile adhesive for balcony,
terrace and underfloor heating
Adhesive bed up to max.
thickness of 5 mm, -20°C to 80°C, drying time approx. 4.5 hours
PCI Flexmörtel, rapid special tile adhesive for
balcony, terrace and underfloor heating
Adhesive bed up to max.
thickness of 5 mm, -20°C to 80°C, drying time approx. 2-3 hours
or Knauf products (ask your Knauf retailer)
- B. Surface protection for deckings, carpet, PVC, cork etc.
To provide mechanical protection when laying carpet,
PVC, cork etc., the heating mat should be covered with a 5 to 10 mm protective
layer.
We recommend:
PCI Periplan 10, up to 10mm thickness
PCI Periplan 20, up to 20mm thickness
- Use a multimeter to check continually whether the heating
mat is still conducting (resistance as given in technical specifications)
when laying.
|
2.8 Covering the floor heating:
|
- A. Laying tiles and natural stone plates:
Follow the instructions of the adhesive manufacturer
very carefully.
Apply the adhesive to the floor using a spreader
(3-4 mm). Lay the heating mat with the heating wire facing upwards (smooth
side downwards) into this adhesive bed and press it down carefully using
a smoothing disc.
Carefully smooth any squeezed-through adhesive. Then
cover the top of the heating mat again with a layer of special flexible adhesive
(4-6 mm spreader) into which the tiles or natural stone plates are laid.
During the laying process ensure that the temperature
sensor is laid between heating wires (as per room layout plan).
Feed the PTC resistor wires along the floor in the
adhesive bed to the heating connection box and feed them into the heating
box through a prepared flexitube.
When pointing the tiles, use a flexible sealing compound.
Page 9
- B. Laying deckings such as carpet, PVC, cork, parquet:
Once the heating mat has been laid as described above
and covered with a second layer of special flexible adhesive, carefully smooth
this mechanical protective layer with the smoothing disc.
If necessary, this dry adhesive surface can be recoated
after 24 hours to make the surface smooth and flat (PCI Periplan).
Follow the filler manufacturer's instructions very
carefully.
Preparation of the surface depends on the type of
special adhesive required e.g. of cork, PVC, parquet or carpet.
A primer should always be used as an undercoat for
fixing and for improving the bond.
Depending on the amount of dampness in the base,
do not start laying the decking until after at least three days. Only use
suitable deckings which are compatible with floor heating.
Note the following thermal conductance values:
¾ lvalue = 0.14 W/(m.K) for parquet, max. 16mm thickness
¾ lvalue = 0.09 W/(m.K) for carpet, max. 20mm thickness
¾ lvalue = 0.08 W/(m.K) for cork, max. 10mm thickness
¾ lvalue = 0.23 W/(m.K) for PVC, max. 10mm thickness
¾ lvalue = 1.00 W/(m.K) for tiles, max. 30mm thickness
¾ lvalue = 1.00 W/(m.K) for natural stone, max. 30mm thickness
|
|
The heating wires should neither touch the PTC
resistor wires nor cross them.
Check the Ohm values continually while laying
and compare them with the first reading …
If the heating mat is damaged, this should then
be recognised immediately and the faulty heating mat can be exchanged for
an undamaged one.
Leave notification alerting other craftsmen that
electrical floor heating has been installed in the room.
|
Page 10
3. Electrical connections:
- The heating mat should be fitted electrically by a qualified
electrician in accordance with the current VDE regulations and these fitting
instructions.
- The contact holes of all poles of the floor
heating connections should be at least 3mm from the mains. Circuit breakers,
fuses and distributor contactors are suitable disconnection devices.
- The regulations of the local electricity provider should be
observed. The heating circuit should also feature a 30 mA circuit breaker,
especially in showers and bathrooms, to ensure protection and safety against
dangerous electrical shocks (it is normally sufficient if the apartment or
at least the bathroom junction box from where the heating current originates
is fitted with a circuit breaker). Connect the floor heating as shown in
the diagrams. Make sure the PE wire (yellow/green) is properly connected.
- Several heating mats can be connected to a single electronic
thermostat.
Important:
Multiple heating mats should only be connected in
parallel and not in series.
- Do not exceed the maximum switched current (switching capacity)
given in the technical specifications.
|
3.1 Circuit diagrams:
|
e.g. laying cables
|
After work:
Once the work has been completed a rating plate containing
the Ohm value should be clearly displayed in the junction box. Make a note
of this junction box in the room layout plan and hand these fitting and
operating instructions to the owner for safekeeping.
Start-up:
After 48 hours the floor heating can be gradually
heated up (5°C per day).
|
|
Wiring: EB 52531
|
Wiring: EB 52527 / 28
|
Page 11
- Technical Data:
4.1 Measurement record:
|
Item no.:
|
Power:
Watt/item
|
Dimensions:
L x W in m:
|
Area:
m²
|
Ohm value/heating mat
approx.
|
Voltage:
1/N/PE
|
Three values:
Room:
W
|
|
WT PV-3L-5N 160 Watt /m² 0.3m width 3mm thickness
|
|
WTL1,216
|
192 Watt
|
4.0 x 0.3
|
1
|
276 W
|
230V/50Hz
|
|
|
WTL2,416
|
384 Watt
|
6.7 x 0.3
|
2
|
138 W
|
230V/50Hz
|
|
|
WTL3,616
|
576 Watt
|
10.0 x 0.3
|
3
|
92W
|
230V/50Hz
|
|
|
WT PV-3-10N 120 Watt /m² width 3mm thickness /AL-Twin 150Watt/m² 1,5mm 0.5m
|
|
WTN112/ALT115
|
120/150 Watt
|
2x0,5
|
1
|
441W/353 W
|
230V/50Hz
|
|
|
WTN1,512
|
180 Watt
|
3x0,5
|
1,5
|
294W
|
230V/50Hz
|
|
|
WTN212/ALT215
|
240/300 Watt
|
4x0,5
|
2
|
220W/176W
|
230V/50Hz
|
|
|
WTN312/ALT315
|
360/450 Watt
|
6x0,5
|
3
|
147W/118W
|
230V/50Hz
|
|
|
WTN412/ALT415
|
480/600 Watt
|
8x0,5
|
4
|
110W/88W
|
230V/50Hz
|
|
|
WTN512/ALT515
|
600/750 Watt
|
10x0,5
|
5
|
88W/71W
|
230V/50Hz
|
|
|
WTN612/ALT615
|
720/900 Watt
|
12x0,5
|
6
|
73W/59W
|
230V/50Hz
|
|
|
WTN712/ALT715
|
840/1050Watt
|
14x0,5
|
7
|
63W/50W
|
230V/50Hz
|
|
|
WTN812/ALT815
|
960/1200Watt
|
16x0,5
|
8
|
55W/44W
|
230V/50Hz
|
|
|
WT PV-S-10N and WT PV-3L-5N 160 Watt /m² 0.5m width 3mm thickness
|
|
WTL/WTN116
|
160 Watt
|
2 x 0.5
|
1
|
331 W
|
230V/50Hz
|
|
|
WTL/WTN1,516
|
240 Watt
|
3 x 0.5
|
1.5
|
220 W
|
230V/50Hz
|
|
|
WTL/WTN216
|
320 Watt
|
4 x 0.5
|
2
|
165 W
|
230V/50Hz
|
|
|
WTL/WTN316
|
480 Watt
|
6 x 0.5
|
3
|
110 W
|
230V/50Hz
|
|
|
WTL/WTN416
|
640 Watt
|
8 x 0.5
|
4
|
83 W
|
230V/50Hz
|
|
|
WTL/WTN516
|
800 Watt
|
10 x 0.5
|
5
|
66 W
|
230V/50Hz
|
|
|
WTL/WTN616
|
960 Watt
|
12 x 0.5
|
6
|
55 W
|
230V/50Hz
|
|
|
WTL/WTN716
|
1120Watt
|
14 x 0.5
|
7
|
47 W
|
230V/50Hz
|
|
|
WTL/WTN816
|
1280Watt
|
16 x 0.5
|
8
|
41 W
|
230V/50Hz
|
|
|
FH 160Watt /m² 0.5m width 2mm thickness
|
|
FH 116
|
160 Watt
|
2 x 0.5
|
1
|
330 W
|
230V/50Hz
|
|
|
FH 1,516
|
240 Watt
|
3 x 0.5
|
1.5
|
220 W
|
230V/50Hz
|
|
|
FH 216
|
320 Watt
|
4 x 0.5
|
2
|
165 W
|
230V/50Hz
|
|
|
FH 2,516
|
400 Watt
|
5 x 0.5
|
3
|
132 W
|
230V/50Hz
|
|
|
FH 316
|
480 Watt
|
6 x 0.5
|
3
|
110 W
|
230V/50Hz
|
|
|
FH 416
|
640 Watt
|
8 x 0.5
|
4
|
83 W
|
230V/50Hz
|
|
|
FH 516
|
800 Watt
|
10 x 0.5
|
5
|
66 W
|
230V/50Hz
|
|
|
FH 616
|
960 Watt
|
12 x 0.5
|
6
|
55 W
|
230V/50Hz
|
|
|
FH 716
|
1120Watt
|
14 x 0.5
|
7
|
47 W
|
230V/50Hz
|
|
|
FH 816
|
1280Watt
|
16 x 0.5
|
8
|
41 W
|
230V/50Hz
|
|
|
FH 916
|
1440Watt
|
18 x 0.5
|
9
|
37 W
|
230V/50Hz
|
|
|
Item no.:
|
Power:
Watt/item
|
Dimensions:
L x W in m:
|
Area:
m²
|
Ohm value/heating mat
approx.
|
Voltage:
1/N/PE
|
Three values:
Room: W
|
|
FH Twin 160Watt /m² 0.5m width 2mm thickness
|
|
FHT 116
|
160 Watt
|
2 x 0,5
|
1
|
330 W
|
230V/50Hz
|
|
|
FHT 1,516
|
240 Watt
|
3 x 0.5
|
1.5
|
220 W
|
230V/50Hz
|
|
|
FHT 216
|
320 Watt
|
4 x 0.5
|
2
|
165 W
|
230V/50Hz
|
|
|
FHT 2,516
|
400 Watt
|
5 x 0.5
|
3
|
132 W
|
230V/50Hz
|
|
|
FHT 316
|
480 Watt
|
6 x 0.5
|
3
|
110 W
|
230V/50Hz
|
|
|
FHT 416
|
640 Watt
|
8 x 0.5
|
4
|
83 W
|
230V/50Hz
|
|
|
FHT 516
|
800 Watt
|
10 x 0.5
|
5
|
66 W
|
230V/50Hz
|
|
|
FHT 616
|
960 Watt
|
12 x 0.5
|
6
|
55 W
|
230V/50Hz
|
|
|
FHT 716
|
1120 Watt
|
14 x 0.5
|
7
|
47 W
|
230V/50Hz
|
|
|
FHT 816
|
1280 Watt
|
16 x 0.5
|
8
|
41 W
|
230V/50Hz
|
|
|
FH T916
|
1440 Watt
|
18 x 0.5
|
9
|
37 W
|
230V/50Hz
|
|
|
TF-S-R-3L 300 Watt /m² 0.5m width 6mm thickness
|
|
TFR130
|
300 Watt
|
2 x 0.5
|
1
|
176 W
|
230V/50Hz
|
|
|
TFR1,530
|
455 Watt
|
3 x 0.5
|
1.5
|
118 W
|
230V/50Hz
|
|
|
TFR230
|
600 Watt
|
4 x 0.5
|
2
|
88 W
|
230V/50Hz
|
|
|
TFR330
|
900 Watt
|
6 x 0.5
|
3
|
59 W
|
230V/50Hz
|
|
|
TFR430
|
1200 Watt
|
8 x 0.5
|
4
|
44 W
|
230V/50Hz
|
|
|
TFR530
|
1500 Watt
|
10 x 0.5
|
5
|
35 W
|
230V/50Hz
|
|
|
TFR630
|
1800 Watt
|
12 x 0.5
|
6
|
29 W
|
230V/50Hz
|
|
|
TFR730
|
2100 Watt
|
14 x 0.5
|
7
|
25 W
|
230V/50Hz
|
|
|
TFR830
|
2400 Watt
|
16 x 0.5
|
8
|
22 W
|
230V/50Hz
|
|
|
Thermofloor S 160 Watt /m² or 200 Watt/m² 0.5m
width 4mm thickness
|
|
TFS116/TFS120
|
160W/200W
|
2 x 0.5
|
1
|
330 W/264 W
|
230V/50Hz
|
|
|
TFS216/TFS220
|
320W/400W
|
4 x 0.5
|
2
|
165 W/132 W
|
230V/50Hz
|
|
|
TFS316/TFS320
|
480W/600W
|
6 x 0.5
|
3
|
110 W/88 W
|
230V/50Hz
|
|
|
TFS416/TFS420
|
640W/800W
|
8 x 0.5
|
4
|
82 W/66 W
|
230V/50Hz
|
|
|
TFS516/TFS520
|
800/1000W
|
10 x 0.5
|
5
|
66 W/53 W
|
230V/50Hz
|
|
|
TFS616/TFS620
|
960/1200W
|
12 x 0.5
|
6
|
55 W/44 W
|
230V/50Hz
|
|
|
TFS720
|
1120/1400W
|
14 x 0.5
|
7
|
47 W/38 W
|
230V/50Hz
|
|
|
TFS820
|
1280/1600W
|
16 x 0.5
|
8
|
41 W/33 W
|
230V/50Hz
|
|
|
TFS916/TFS920
|
1440/1800W
|
18 x 0.5
|
9
|
37 W/29 W
|
230V/50Hz
|
|
|
FH 100 W /m² 0,5m Breite 2mm thickness
|
|
FH 1010
|
1000W
|
20x0,5
|
10
|
53W
|
230V/50Hz
|
|
|
FH 1210
|
1200W
|
24x0,5
|
12
|
44W
|
230V/50Hz
|
|
|
FH 1410
|
1400W
|
28x0,5
|
14
|
37W
|
230V/50Hz
|
|
|
FH 1610
|
1600W
|
32x0,5
|
16
|
33W
|
230V/50Hz
|
|
|
FH 1810
|
1800W
|
36x0,5
|
18
|
29W
|
230V/50Hz
|
|
|
FH 2010
|
2000W
|
40x0,5
|
20
|
26W
|
230V/50Hz
|
|
|
TFS1020/TFL1025
|
2000/2500W
|
14 x 0.5
|
10
|
26 W/21 W
|
230V/50Hz
|
|
|
TFS1220/TFL1225
|
2400/3000W
|
16 x 0.5
|
12
|
22W/18W
|
230V/50Hz
|
|
|
TFS1420/TFL1425
|
2800/3500W
|
18 x 0.5
|
14
|
19 W/15 W
|
230V/50Hz
|
|
|
TFS1620/TFL1625
|
3200/4000W
|
16 x 0.5
|
16
|
17 W/13 W
|
230V/50Hz
|
|
|
TFS1820/TFL1825
|
3600/4500W
|
18 x 0.5
|
18
|
15 W/12 W
|
230V/50Hz
|
|
nh
Electrical
underfloor heating
Electrical
undertile heating
Electrical
thin-bed underfloor undertile heating
Electric under
floor heating
Electric under
tile heating
Electric thin-bed
under floor heating under tile heating
eizung Elektroheizung
electric Wärmeboden floor heating system Heizboden Heizmatten heat warm
bath kitchen Kinderzimmer tiles stone floor cold feet Trockenboden Altbausanierung
Ferkelaufzucht Fliesenkleber Eberle Tekmar Termostat
electric underfloor heating Fliesenheizung
floor heating system Heizmatten Wärmeboden Badheizung Temperierung Speicherheizung
bath tiles Elektroheizung Flächenheizung Wintergarten frostschutz Eberle
Heizboden Dünnbrettheizmatten Altbausanierung Trockenboden warmth cold feet
Fuesse parquet Fliesenkleber Bodentemperierelemente 48V renovating Zeitschaltuhr
Fliese
Look at!
Undertile Heating
Look at!
Underfloor Heating
hei
Fur underfloor heating systems are suitable for all types of property,
whether domestic or commercial, and can be easily linked into any
heat source (including solar, geothermal, or an existing
or new central heating system). If you want to just heat your conservatory,
bathroom or kitchen floors (perhaps as part of a renovation or self
build project) you will find that Continental underfloor heating
systems are competitive to electric based systems, and installation
can be a DIY project. As a leading UK supplier, you buy
safe in the knowledge that our systems are designed to comply
with all the relevant floor heating regulations and
standards, and all components are manufactured using ISO accredited
processes. And unlike most suppliers we won't try to sell you what you
don't need.
On this site you can find out about who we are, what we do and why
we think you should buy our underfloor heating systems.
Underfloor Heating for Carpets and Laminate Floors
s amorphous heating elements offer either comfort heating or total heating
specifically for carpeted and laminate flooring.
heating mats are constructed from wide metallic ribbons that cover at
least 25% of the floor area. This large heat transfer area allows the
heating element to operate at very low temperatures, of about 30 degrees
and still generate the required heat to the surrounding area. The low working
temperature allows direct installation of timber, parquet or carpet above
the heating mats with no danger of damaging the colour, texture or coating
of these delicate floor coverings.
The range of heating mat sizes enables the user to easily cover at least
80% of almost every room floor.
Note: To achieve the best results we recommend, as a rule, to cover at
least 75% of the floor area. This includes 5 to 25 cm margins from the
walls to the heating mats.
All heating mats fit directly under timber or parquet flooring and under
wall-to-wall carpets.
The mats are available in a range of sizes from 1- 3 square metres. Each
mat is 0.5m or 1.0m wide. For example, a 5 square metre mat is 0.5m wide
and 10m long.
Question:
Why are there two different types
of mat - one for timber and one for concrete floors ?
Answers
Our mats have
been tested to the European standard IEC335/EN60335, it is recommended
that no higher than 100W/m2 should be installed on a timber floor, as safety
is paramount, we adhere to this instruction. It has been found that concrete
absorbs heat at a higher rate than timber, therefore we developed a mat
with an output of 150W/m2 to counter-act this.
Question
I have seen some products that are just a cable or thin foil, why
is the devimat® a cable on a mesh ?
Answers
During our product research, we discovered,
that it was more desirable for the heating element to become an integral
part of the floor rather than a foil type that separates the tile adhesive
from the floor. We know that it is a better solution for the customer to
have a product with pre-determined spacing for the heating element.
This removes the problem of cables being
crossed or touching, which will cause failure of the heating element and
can be very costly if the floor has been finished.
We have also found that without pre-determined
spacing a warm-cold ripple effect can be created with a cable system that
is one length to cover a variety of areas.
The devimat® is much easier and quicker to
fit, there is no waiting for special glues or primers to dry, no sticking
tape over lengths of cable. Simple to fit around obstacles, a much better
option than foils - the mat can be cut to suit most areas.
Question
Can it be used with
wooden or laminate floors as well as tiles and stone?
Answers
The devimat® is manufactured in Denmark 'the home' of wood and
laminate floors, the devimat® is perfectly safe to fit under these types
of floors. Please contact us for further details.
Question
How safe is it ?
Answers
DEVI have been developing
and manufacturing heating cables for over 30 years.
All DEVI cables satisfy
the requirements of IEC 800. The devimat® cable is double insulated with
an earthed screen under
the
sheath and has the approval IEC 335/EN 60335.
All devimat® systems use a floor temperature
sensor connected to a devireg® electronic thermostat to control floor
temperature.
Question
Won't your
feet get too hot ?
Answers
The devireg® thermostat can be adjusted to accurately control
floor temperature to the level you find most comfortable.
Question
Isn't it expensive to run ?
Answers
The devimat® tile warming
system only uses as much electricity as a standard light bulb per m². The
on-off cycling effect of the floor temperature-sensing thermostat can reduce
this by as much as 50%.
Question
Who can install it ?
Answers
Anyone can install it as long as they follow
the straightforward instructions supplied with the heating system. However,
it is advisable for a qualified electrician to connect the heating system
to the electrical supply.
The cable is guaranteed for ten years if
installed in accordance with the Installation Instruction booklet.
Question
What happens if the
space on the floor is not a rectangle and the mat will not exactly fit
?
Answers
The devimat® can be cut across the width of the mat between the
cable loops so that the mat can be bent round to provide e.g. an "L" shape.
Care should be taken to avoid damaging the cable. Under no circumstances
should the heating cable be cut or shortened.
Question
Will the heat affect the tile adhesive
or tiles ?
Answers
DEVI warmed
ceramic tiled floors will run with a surface temperature of about 22°C
and the adhesive under the tiles will be a few degrees higher. This temperature
will have no effect on the tiles or the tile adhesive. The majority of
the leading adhesive manufacturers have confirmed this.
Question
Can electric heating on a wooden floor cause a fire ?
Answers
A devimat® system installed to DEVI instructions
will be completely safe as the cables are manufactured to IEC 335/EN 60335
standard. DEVI offers a 100W/ m2 specifically for timber floors. However,
a qualified electrician should make the electrical connections.
Question
Can the cable on the
mat be damaged if a ceramic tile is broken ?
Answers
It is unlikely that the cable will be damaged as there will be a
layer of adhesive between the tile and the devimat® which will offer mechanical
protection. The devimat® will be installed with the cable facing down. This
will give the screened cable, which is already tough, additional protection.
If there is any suspicion that damage may have occurred, the cable
should be electrically tested.
Question
What happens if the floor floods ?
Answers
DEVI cables and cold
tail terminations are waterproof. Also all devimats have an earthed screen
under the outer sheath should a fault occur.
Question
What happens if the floor is drilled ?
Answers
Floors in which electric heating is installed
should not be drilled. However should the cable be damaged, the earthed
screen around the cable will protect the operator by causing the electrical
protection device at the supply intake position to switch off the circuit.
Question
How much will it cost
to buy heating under the tiles ?
Answers
The total cost for an average 3.5m² net area bathroom (this excludes
areas such as under the bath and toilet), including the DEVI floor sensor
and devireg® electronic thermostat, would be £252.60 inc. VAT. Installation
costs are minimal, the devimat® can be laid quickly before the tiles are
fixed and the cable ends can be easily connected to a local electricity
supply.
Question
How long will the heating system last ?
Answers
Once the devimat® is
installed in accordance with the Installation Instruction booklet, the cable
should last as long as the other electrical wiring in the building.
DEVI has been manufacturing
cables and thermostats for over 30 years. We have not known any cables
to fail due to age.
Question
Will the system fully heat the room ?
Answers
DEVI also install heating systems under new
floors which provide full heating, but the devimat® system is used to
provide a warm surface to walk on and it will keep floors in areas where
water can splash dry.
Question
How is it controlled
?
Answers
The system is controlled by the floor temperature sensor and wall
mounted electronic devireg® thermostat. This prevents the floor from over
heating. The most comfortable surface temperature will be 22°C. this is easily
adjusted (and can be increased if required) by turning the dial on the thermostat.
Question
Can you install it on a wooden floor ?
Answers
The system can be installed
on a wooden floor. Normally a heat resistant compound is spread on the
floor and allowed to set before laying the devimat®. As intermediate wooden
floors can experience some flexing, it may be necessary to brace the floor
by laying 15mm plywood and screwing it down at frequent intervals to limit
the flexing so that the tiled floor has a stable base.
Question
Is it guaranteed ?
Answers
All deviheat® cables are guaranteed for 10
years when installed in accordance with DEVI installation instructions (thermostats
and controllers two years).
Question
Won't there be a lot
of upheaval if I install deviheat® under the new tiles ?
Answers
The new devimat® is designed to be installed on top of the existing
floor so that the tile adhesive and tiles can be easily applied once the
devimat® is fixed in position. There is no need to excavate the floor and
the devimat® will increase the finished floor height by only 3mm.
Question
Can the system be installed on an asphalt/bitumen
floor construction ?
Answers
devimat® can be installed
on this type of floor as long as the surface is first coated with a primer.
Refer to the adhesive company for guidance on a suitable primer.
Underfloor
Heating (Water)
Utilising
modern under floor heating multilayer pipes, control systems and high
efficiency boilers, the underfloor heating systems of today are
extremely comfortable and controllable. Radiators are no longer needed
so giving more floor space. The heat is more evenly distributed and dust
is not circulated.
Underfloor heating from the whole floor area of the house gently warms
the air above, eliminating cold spots. The warm air convects from the floor
surface losing approximately 2 degrees centigrade at 2.0 meters above
the floor, which makes the systems ideal for all ceiling heights. Independent
tests reveal that the most acceptable indoor climate is one in which the
floor temperature ranges between 19-29�C and the air temperature at head
level ranges between 20 and 24�C. With radiator or convector heating systems
a vertical temperature gradient is produced; colder at foot level than
at the head. Underfloor heating has made it possible to reduce energy consumption
by using low water temperatures. Systems, based on the development of
complex and very high quality under floor plastic pipe, such as the multi-layer
pipe, now account for over 60% of some European heating markets.
Underfloor
heating layout
The under floor pipe is laid at
200-300mm centres dependent upon design. Care must be taken to protect
the pipe work whilst installing the screed. Finally the floor finish is
laid. The heating works well with almost any floor finish; tiles, carpets
(use carpets with a resistance of less than 0.15 m2K/W), timber floors,
plastic etc. The floor coverings and the adhesive must be suitable for
the temperatures that underfloor heating will provide, the maximum temperature
they need to resist is 40�C.
(Example
of a typical underfloor heating pipe layout is shown adjacent>)
Please Note:
Always check with the manufacturer of the floor covering if it can be
used for underfloor heating. Timber floors need to have a moisture content
below 10% to avoid shrinkage. The heating system must be operated for
21 days with a very low temperature.
Underfloor Heating (Electrical)
With Raychem Floor Heating
solutions there is no need to add height to the floor. Systems range from
3 mm to 13 mm in thickness and are suitable for all floor coverings. They
can be installed on most subfloor constructions, such as wood, plaster
& concrete.
Design using smart software:
New free design service
Raychem offers a smart and free service, resulting in a detailed
professional design. Based upon your project drawing you will receive
a complete offer including:
-
Project list with all relevant project data
-
Detailed bill of materials
-
Installation plan with circuit lengths of the recommended
heating products in 2D and 3D
-
A recommendation of suitable building materials
-
Building materials selector: for a perfectly finished
warm floor Raychem systems have been tested with building materials from
the leading manufacturers in Europe.
Features & Benefits
Underfloor Heating has proven itself to be comfortable, reliable
in operation and a good-value solution to heating modern buildings. As the
maintenance-free pipe work or heating cable elements are included in the
floor construction, the usual constraints imposed by radiators disappear.
Space within the room is freed up for people, furnishings or equipment.
Water Systems use PEX pipe and provides a long-life, economical solution
to heating most types of building. The high radiant component and the temperature
gradient of the heat output provides a comfortable, warm environment for
the occupants of the building. The low operating temperature of warm water
under floor heating (generally 45�c - 50�c degree with a 10�c drop) means
that the heating allows condensing boilers to operate in their most efficient
mode. Apart from the manifolds for water based systems (which are generally
located in an unobtrusive place) and the room thermostats, the system is
invisible. This maximises the room space available and offers flexibility
for interior design. Using timers and programmers to control room thermostats
and manifold circuit actuators, the underfloor heating system can be set
to meet the requirements of occupants of individual rooms or zones. In public buildings, the
absence of visible heat emitters eliminates the risk of damage due to
accident or vandalism. The heating systems can be controlled using timers/programmers
and individual rooms can each have their own room thermostat. The PEX
pipework or electrical under floor heating cables are maintenance-free
(PEX not affected by corrosion inhibitors which may be present in the heating
system). Underfloor Heating can be used in conjunction with radiators -
in fact it is quite common. For water based systems both heating systems
can be fed from the same heat source but the under floor system requires
a pump and mixing valve set to reduce the flow temperature - there are a number of other features and benefits:-
Space & Economics
Every square floor metre of your home can be fully utilised and the
cost for our system is very similar to a radiator system.
Hygiene
No dust and the underfloor heating will help to reduce house dust mites
which is a benefit to asthma sufferers. Moisture content is too low, to
support dust mites.
Aesthetics and Labour saving
You can design your home to suit your needs rather than that of your
heating engineer. Cleaning of the floors is easier and wet floors dry very
quickly. Prevents discolouration of paintwork, peeling of paper etc.
Comfort
Radiant heat will provide the highest comfort levels at an even temperature
throughout.
Silence
Compared to radiator systems, there is no noise. No annoying ticking
as pipes expand in floor voids.
Cost effective
It has been proven that energy saving from 15-40% can be achieved with
underfloor heating.
Ease of control
Small temperature between the floor surface and the air above means
the system is practically self regulatin
Smart Products
For new construction and renovation projects:
With Raychem Floor Heating
solutions there is no need to add height to the floor. Our systems range
from 3 mm to 13 mm in thickness and are Suitable for all floor coverings.
They can be installed on all stable constructions, such as wood,
plaster & concrete.
Smart services - Underfloor
heating design using smart software:
New free design service
Raychem offers a smart and
free service, resulting in a detailed professional design. Based upon your project drawing you will receive
a complete offer including:
- Project list with all relevant project data
- Detailed bill of materials
- Installation plan with circuit lengths of the recommended heating
products in 2D and 3D
- A recommendation of suitable building materials
Building materials selector: for a perfectly finished warm floor
Raychem systems have been tested with building materials
from the leading manufacturers in Europe. You can consult
to see which products are compatible with Raychem underfloor
heating, to guarantee the client a perfectly installed warm floor.
Raychem Underfloor heating website : smart online tools
- An energy consumption calculator that gives an average power consumption
per system
- A free design wizard for product selection
- "We design it for you" service - LET US DO THE WORK.
Complete Systems for professional and
reliable underfloor heating
Raychem also provide
Performance controls for increased efficiency
Raychem TA Control
The new Raychem TA brings
innovation to its standard floor heating thermostat. The floor, or ambient,
sensing thermostat has a digital interface for easy use. Other critical
benefits include a 2 pole mains switch for additional safety, and remote
temperature set-back function, "Boost" function, and lockable settings.
This floor heating control is compatible with all Raychem floor heating
systems.
Raychem TC Control
The new Raychem TC controller offers excellent functionality
for performance, control, and energy efficiency. This programmable thermostat
can be controlled by floor sensor, ambient/room sensor, or room sensor
with the floor sensor acting as a limiter which will ensure the floor
is not overheated. With its large, backlit display, use of the controller
is simple. Functions included with this control include a timer function
for precise temperature, selection at any time of the day, a boost function,
set back function, lockable settings and much more.
- Both Raychem Control Units are available
in white & Silver finishes
- Our triple warranty assures Quality & peace of mind
- We guarantee our products for 12 years
- Our products are PVC free
- Our products do not emit any electrical or magnetic fields due
to their design
WarmsFloor
Welcome to
WarmFloors Ltd - we are specialists in the supply and installation of
electric underfloor heating. WarmFloors Ltd supply both direct to the
public as well as installers, builders, developers, conservatory companies
& retail tile outlets - all at discount prices.
The majority of our products are available direct from our extensive
stocks and we aim to deliver the next working day wherever possible. WarmFloors
only supply electric underfloor heating systems used and approved by professional
throughout the UK and Europe. Ideal when tiling or laminating for both
existing and new floors.
Until recently in the UK most people thought that the only way to effectively
warm their home was through using radiators or wall mounted heaters. This
no longer has to be the case with our invisible and easy to use systems
that can act as a companion to your existing heat system or replace it
completely!
Whats more is the underfloor systems make laminate/timber/tiled floors
much more inviting to walk upon. They are easy to install making our underfloor
heating very much a DIY product, although if help and advice is required
then don't hesitate to contact us.
Underwood Heating - Carbon Heating Film
With wood and laminate flooring becoming increasingly popular for many
uses the need to make such flooring more inviting especially in winter when
they can be cold and uncomfortable, has never been more important.
At WarmFloors we have the answer offering you an efficient supply &
design service whether it be for your living room, bathroom etc.
We use a revolutionary carbon heating film which is installed directly
below your wood or laminate flooring providing a fast acting heat system
which is most cases can replace radiators and other conventional forms
of heating.
Its unique double laminated design means that the element itself is
less than half a millimetre thick and yet is extremely durable and robust.
It offers an attractive alternative to other sources such as radiators,
as it is hidden from view and can free up much needed space which other
heat sources would congest.
Floor Temperature
Most wood and laminate floors will not exceed 27c on their surface, this
is a comfortable temperature and certainly will not be too hot to walk
upon.
Undertile Heating - Cable Kit or Cable Mat
Cold surfaces such as tiles, stone and marble can also be uninviting
to walk upon. UTH System provides the perfect and warming solution.
This system is most popular in bathrooms, kitchens, conservatories
and sun rooms. It can be used anywhere where tiles, stone or marble floors
are being fitted.
The under tile heating system is similar to the underfloor system in
the benefits it brings and its use but instead of a carbon film being fitted
a 3mm cable is used instead.
The system contains the latest design in heating cable that incorporated
an earth screen and a double insulation layer. With such design features,
where is a 10 year guarantee from date of installation. There are two
types to choose from - the Cable Kit and the Cable Mat.
The Cable Kit is best suited for small areas and the Mat for large areas.
Insulation
Insulation plays a key role in maximising the efficiency of underfloor
heating.
The use of an insulated tile-backer board will in almost all cases reduce
the warm up time and subsequent running costs of the system. They make
a significant difference when the system is being used a a primary heat
source on an un-insulated floor or where quick warm-up times are desirable
such as a conservatory.
Those who choose not to use insulation boards will experience a great
heat loss through their floors. There are a variety of boards on the market,
all of which are of a fairly similar high quality design and efficiency.
Digital Thermostat
Each kit purchased comes with an elegant digital thermostat with built
in timer.
Installation
WarmFloors operates an installation service which is mainly in the Yorkshire
area but does stretch nationwide on larger projects.
Features:
• Elegant Design • Simple to use and program • 24 hour 7 day timer •
Comfort and economy temperature settings • Vacation setting • Manual over-ride
• Memory back-up • Supplied with Floor Sensor
Electric underfloor electric heating
Systems
UK’s
leading manufacturer of underfloor electric heating
products, having sold over underfloor heaters in the
UK alone. Our track record guarantees that you get the best available, backed
by the largest support team in the industry.
zung electric Wärmeboden floor heating
system Heizboden Heizmatten heat warm bath kitchen Kinderzimmer tiles stone
floor cold feet Trockenboden
Altbausanierung Ferkelaufzucht Fliesenkleber
Eberle Tekmar thermostat Wochenzeitschaltuhr
electric underfloor heating Fliesenheizung
floor heating system Heizmatten Wärmeboden Badheizung Temperierung Speicherheizung
bath tiles Elektroheizung Flächenheizung Wintergarten
frostschutz Eberle Heizboden Dünnbrettheizmatten
Altbausanierung Trockenboden warmth cold feet Fuesse parquet Fliesenkleber
Bodentemperierelemente 48V renovating Zeitschaltuhr warm floor Heizleitung
floor-covering Badfussboden bad fliesenheizung elektroheizung tile Tageszeitschaltuhr
Raumheizung Thermo Fliesenwarm electronically Fussbodenfühler floor of
warm warms feet Fuesse planning elekto Direktheizung Zusatzheizung
Tageszeitschaltuhr Raumheizung Thermo
Fliesenwarm electronically Fussbodenfühler
Fliesenheizung Elektroheizung electric
Wärmeboden floor heating system Heizboden Heizmatten heat warm bath kitchen
Kinderzimmer tiles stone floor cold feet Trockenboden
Altbausanierung Ferkelaufzucht Fliesenkleber
Eberle Tekmar thermostat Wochenzeitschaltuhr
electric underfloor heating Fliesenheizung
floor heating system Heizmatten Wärmeboden Badheizung Temperierung Speicherheizung
bath tiles Elektroheizung Flächenheizung Wintergarten
frostschutz Eberle Heizboden Dünnbrettheizmatten
Altbausanierung Trockenboden warmth cold feet Fuesse parquet Fliesenkleber
Bodentemperierelemente 48V renovating Zeitschaltuhr
Cabeltherm Unitherm Flexel ThermoVlies
plus BET bet 2000 ElektroTherm Bauerhin Halmburger comfortfloor Dynatherm
Heizfolie Heizteppich Comfortfloor Sucotherm
[Conditions of
sale and delivery] [PriceList] [Picture-PriceList
as word.doc] [Look at Set-Offer] [Detailed
product information Laying tips]